【HarmonyOS NEXT】层级轮播卡片效果
2025-06-30 23:26:44
466次阅读
0个评论
【HarmonyOS NEXT】层级轮播卡片效果
##鸿蒙开发能力 ##HarmonyOS SDK应用服务##鸿蒙金融类应用 (金融理财#
一、功能效果:
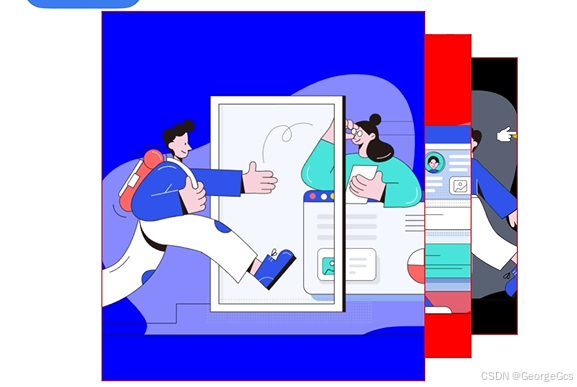 1.上下堆叠由大到小的卡片层叠效果。
2.上层卡片可手势左右滑动,自动左滑动。
3.三层卡片随滑动,内容进行依次切换。
二、开发思路
【完整代码见章节三】
1.最上层使用swiper进行轮播效果的实现。
  @Builder
  HeadSwiperLayerView() {
    Swiper(this.swiperController) {
      this.HeadCard()
      this.MiddenCard()
      this.EndCard()
    }
    .loop(true)
    .autoPlay(true)
    .indicator(false)
    .duration(500)
    .curve(Curve.Friction)
    .displayMode(SwiperDisplayMode.STRETCH)
    .onChange(this.monChangeCallBack)
    .onAnimationEnd(this.monAnimationEndCallBack)

  }

  @Builder
  HeadCard() {
    Row() {
       if (this.HEAD_INDEX == this.mIndex) {
        Image(this.mImageResource[this.HEAD_INDEX])
          .BGCardCardWidthAndHeight()
          .opacity(this.mCardOpacity)
          .CardAnim()
          .borderWidth(px2vp(2))
          .borderColor(Color.Red)
          .backgroundColor(Color.Blue)

      }
    }
    .BGWidthAndHeight()
  }

// MiddenCard EndCard 卡片依照HeadCard进行创建
2.下层两个卡片使用stack堆叠,依次显示。
  build() {
    Stack({ alignContent: Alignment.Center }) {
      // 最底层卡片
      this.EndLayerView()

      // 中间层卡片
      this.MiddenLayerView()

      // 最上层swiper滑动层
      this.HeadSwiperLayerView()
    }
  }
3.整体卡片内容通过list数据进行链式切换。
  // 卡片图片资源池
  @State mImageResource: Array<string | Resource > = [
    $r("app.media.icon_img1"),
    $r("app.media.icon_img2"),
    $r("app.media.icon_img3"),
    $r("app.media.icon_img4"),
    $r("app.media.icon_img5"),
  ];
4.调整切换的index下标数据,控制数据切换,和逻辑计算。
  getImageResource(current: number, mIndex: number) {
    let currentPage: string | Resource = ''
    if (current == this.END_INDEX) {
      if (mIndex == this.HEAD_INDEX) {
        currentPage = this.mImageResource[2];
      } else if (mIndex == this.MIDDEN_INDEX) {
        currentPage = this.mImageResource[0];
      } else if (mIndex == this.END_INDEX) {
        currentPage = this.mImageResource[1];
      }
    } else if (current == this.MIDDEN_INDEX) {
      if (mIndex >= 2) {
        currentPage = this.mImageResource[0];
      } else {
        currentPage = this.mImageResource[mIndex+1];
      }
    } else if (current == this.HEAD_INDEX) {
      currentPage = this.mImageResource[this.mIndex];
    }

    return currentPage;
  }
5.细磨效果,添加透明度动画润色过渡操作的效果。(为了效果更好后续也可添加移动,放大缩小等。示例代码只是添加了透明度。)
三、DEMO示例代码:
滑动组件View SlidingCardView.ets
/**
 * 层叠轮播图
 */
@Component
export default struct SlidingCardView {
  // 滑动层 透明背景宽高
  private BG_WIDTH: number = px2vp(800);
  private BG_HEIGHT: number = px2vp(800);
  // 滑动层 可视卡片宽高
  private BG_CARD_WIDTH: number = px2vp(700);
  private BG_CARD_HEIGHT: number = px2vp(800);
  private CARD_ANIM_START: number = 0.1;
  private CARD_ANIM_END: number = 1;
  private LAYER_CARD_ANIM_START: number = 0.9;
  private LAYER_CARD_ANIM_END: number = 1;
  // 移动下标
  @State mIndex: number = 0;

  @State mCardOpacity: number = this.CARD_ANIM_END;
  @State mLayerOpacity: number = this.LAYER_CARD_ANIM_END;
  // 卡片图片资源池
  @State mImageResource: Array<string | Resource > = [
    $r("app.media.icon_img1"),
    $r("app.media.icon_img2"),
    $r("app.media.icon_img3"),
    $r("app.media.icon_img4"),
    $r("app.media.icon_img5"),
  ];
  private swiperController: SwiperController = new SwiperController();
  private END_INDEX: number = 2;
  private MIDDEN_INDEX: number = 1;
  private HEAD_INDEX: number = 0;

  getImageResource(current: number, mIndex: number) {
    let currentPage: string | Resource = ''
    if (current == this.END_INDEX) {
      if (mIndex == this.HEAD_INDEX) {
        currentPage = this.mImageResource[2];
      } else if (mIndex == this.MIDDEN_INDEX) {
        currentPage = this.mImageResource[0];
      } else if (mIndex == this.END_INDEX) {
        currentPage = this.mImageResource[1];
      }
    } else if (current == this.MIDDEN_INDEX) {
      if (mIndex >= 2) {
        currentPage = this.mImageResource[0];
      } else {
        currentPage = this.mImageResource[mIndex+1];
      }
    } else if (current == this.HEAD_INDEX) {
      currentPage = this.mImageResource[this.mIndex];
    }

    return currentPage;
  }

  private monAnimationEndCallBack = (): void => {
    this.mLayerOpacity = 0.9;
  }

  private monChangeCallBack = (index: number): void => {
    this.mIndex = index;
    this.mCardOpacity = this.CARD_ANIM_START;
    this.mLayerOpacity = this.LAYER_CARD_ANIM_START;
    setTimeout(() => {
      this.mCardOpacity = this.CARD_ANIM_END;
      this.mLayerOpacity = this.LAYER_CARD_ANIM_END;
    }, 100);
  }

  @Builder
  EndLayerView() {
    Row() {
      Blank()
      Image(this.getImageResource(this.END_INDEX, this.mIndex))
        .width(px2vp(500))
        .height(px2vp(600))
        .opacity(this.mLayerOpacity)
        .CardAnim()
        .borderWidth(px2vp(2))
        .borderColor(Color.Red)
        .backgroundColor(Color.Black)
    }
    .width(px2vp(1000))
    .height(px2vp(800))
  }

  @Builder
  MiddenLayerView() {
    Row() {
      Blank()
      Image(this.getImageResource(this.MIDDEN_INDEX, this.mIndex))
        .width(px2vp(400))
        .height(px2vp(700))
        .opacity(this.mLayerOpacity)
        .CardAnim()
        .borderWidth(px2vp(2))
        .borderColor(Color.Red)
        .backgroundColor(Color.Red)
    }
    .width(px2vp(800))
    .height(px2vp(800))
  }

  @Builder
  HeadCard() {
    Row() {
       if (this.HEAD_INDEX == this.mIndex) {
        Image(this.mImageResource[this.HEAD_INDEX])
          .BGCardCardWidthAndHeight()
          .opacity(this.mCardOpacity)
          .CardAnim()
          .borderWidth(px2vp(2))
          .borderColor(Color.Red)
          .backgroundColor(Color.Blue)

      }
    }
    .BGWidthAndHeight()
  }

  @Builder
  MiddenCard() {
    Row() {
      if (this.MIDDEN_INDEX == this.mIndex) {
        Image(this.mImageResource[this.MIDDEN_INDEX])
          .BGCardCardWidthAndHeight()
          .opacity(this.mCardOpacity)
          .CardAnim()
          .borderWidth(px2vp(2))
          .borderColor(Color.Red)
          .backgroundColor(Color.Blue)

       }
    }
    .BGWidthAndHeight()
  }

  @Builder
  EndCard() {
    Row() {
      if (this.END_INDEX == this.mIndex) {
        Image(this.mImageResource[this.END_INDEX])
          .BGCardCardWidthAndHeight()
          .opacity(this.mCardOpacity)
          .CardAnim()
          .borderWidth(px2vp(2))
          .borderColor(Color.Red)
          .backgroundColor(Color.Blue)

       }
    }
    .BGWidthAndHeight()
  }

  @Builder
  HeadSwiperLayerView() {
    Swiper(this.swiperController) {
      this.HeadCard()
      this.MiddenCard()
      this.EndCard()
    }
    .loop(true)
    .autoPlay(true)
    .indicator(false)
    .duration(500)
    .curve(Curve.Friction)
    .displayMode(SwiperDisplayMode.STRETCH)
    .onChange(this.monChangeCallBack)
    .onAnimationEnd(this.monAnimationEndCallBack)

  }

  @Styles
  BGWidthAndHeight(){
    .width(this.BG_WIDTH)
    .height(this.BG_HEIGHT)
  }

  @Styles
  BGCardCardWidthAndHeight(){
    .width(this.BG_CARD_WIDTH)
    .height(this.BG_CARD_HEIGHT)
    .borderWidth(px2vp(2))
    .borderColor(Color.Red)
  }

  @Styles
  CardAnim(){
    .animation({
      duration: 1000,
      tempo: 1,
      delay: 0,
      curve: Curve.Friction,
      playMode: PlayMode.Normal,
      iterations: 1
    })
  }

  build() {
    Stack({ alignContent: Alignment.Center }) {
      // 最底层卡片
      this.EndLayerView()

      // 中间层卡片
      this.MiddenLayerView()

      // 最上层swiper滑动层
      this.HeadSwiperLayerView()
    }
  }
}
入口界面类 Index.ets
import SlidingCardView from './SlidingCardView'

@Entry
@Component
struct Index {

  build() {
    Column(){
      SlidingCardView()
    }
    .width("100%")
    .height("100%")
  }
}
00