HarmonyOS NEXT 闹钟表盘绘制方案分享
2025-03-19 20:27:44
390次阅读
0个评论
最后修改时间:2025-03-19 20:31:50
【引言】 利用ArkUI的Canvas组件可以高效实现动态图形-闹钟表盘的绘制。本文将以实时时钟组件为例,展示如何通过Canvas的坐标变换与动画机制,实现高性能的动态图形渲染效果。
【实现效果】 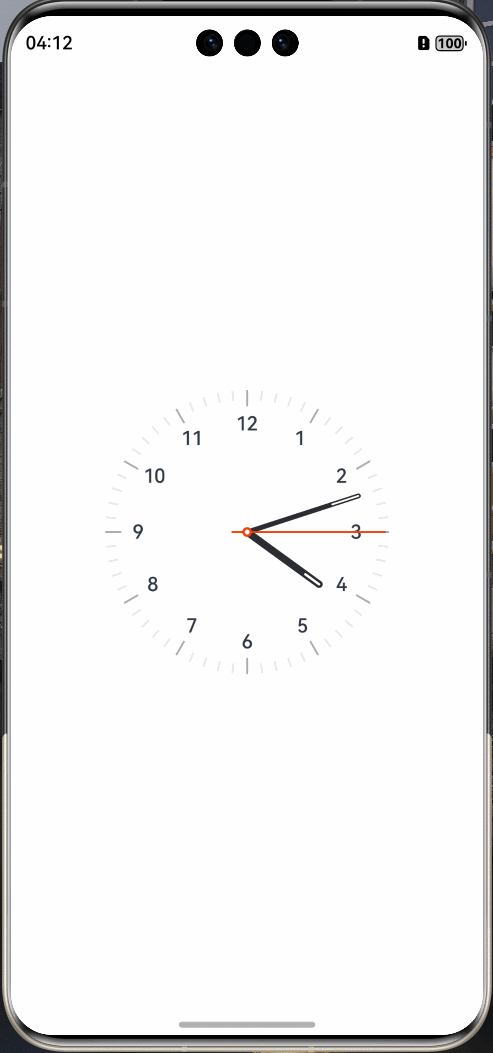
【环境准备】 • 操作系统:Windows 10 • 开发工具:DevEco Studio(5.0.7.210) • 目标设备:华为Mate60 Pro • 开发语言:ArkTS • 框架:ArkUI • API版本:API 14
【工程目录】
│  ├─ obfuscation-rules.txt
│  ├─ oh-package.json5                     // 声明依赖
│  └─ src
│     ├─ main
│     │  ├─ ets
│     │  │  ├─ entryability
│     │  │  │  └─ EntryAbility.ets         //程序入口类
│     │  │  ├─ entrybackupability
│     │  │  │  └─ EntryBackupAbility.ets
│     │  │  ├─ images                      //图片资源类
│     │  │  │  ├─ ic_clock_pan.png
│     │  │  │  ├─ ic_confirm.png
│     │  │  │  ├─ ic_hour_pointer.png
│     │  │  │  ├─ ic_minute_pointer.png
│     │  │  │  ├─ ic_public_arrow_right.svg
│     │  │  │  └─ ic_second_pointer.png
│     │  │  └─ pages
│     │  │     └─ Index.ets                 //主页入口
│     │  ├─ module.json5                    // 模块配置相关
│     │  └─ resources                       // 应用静态资源
│     │     ├─ base
│     │     │  ├─ element
│     │     │  │  ├─ color.json
│     │     │  │  ├─ float.json
│     │     │  │  └─ string.json
│     │     │  ├─ media
│     │     │  │  ├─ background.png
│     │     │  │  ├─ foreground.png
│     │     │  │  ├─ layered_image.json
│     │     │  │  └─ startIcon.png
│     │     │  └─ profile
│     │     │     ├─ backup_config.json
│     │     │     └─ main_pages.json
│     │     ├─ dark
│     │     │  └─ element
│     │     │     └─ color.json
│     │     └─ rawfile
【具体实现】
- 组件架构设计
   @Component
   export struct CanvasComp {
// 核心绘图对象配置
private context: CanvasRenderingContext2D = new CanvasRenderingContext2D(this.settings)
// 资源预加载
private hourImage = new ImageBitmap("/images/ic_hour_pointer.png")
//...其他图片资源 } ● 装饰器架构:采用@Entry和@Component构建标准ArkUI组件 ● 绘图环境:通过RenderingContextSettings启用抗锯齿渲染 ● 资源管理:预加载所有静态图片资源,提升渲染性能 2. 核心绘制流程
this.drawClock()
setInterval(() => {
this.drawClock()
}, 1000)
}

drawClock() {
this.context.clearRect(0, 0, this.canvasSize, this.canvasSize)
this.context.drawImage(this.panImage, 0, 0, this.canvasSize, this.canvasSize)
//...时间获取与指针绘制
}
● 定时刷新:通过setInterval建立秒级刷新机制 ● 分层绘制: a. 清空画布(clearRect) b. 绘制静态表盘(drawImage) c. 动态绘制指针 3. 坐标变换机制
this.context.save()
this.context.translate(this.canvasSize/2, this.canvasSize/2)
this.context.rotate((180 + angle) * Math.PI / 180)
//...绘制逻辑
this.context.restore()
}
● 坐标系控制: ○ translate()移动坐标系到画布中心 ○ rotate()根据时间计算旋转角度(角度转弧度公式:* Math.PI/180) ● 状态堆栈:save()/restore()保证每次绘制不影响全局状态 4. 界面构建
Column() {//列容器组件
Canvas(this.context)
.aspectRatio(1)
.onReady(() => {
this.startDraw()
})
}
.height('100%')//列容器高度
.justifyContent(FlexAlign.Center)//表盘居中
}
● 自适应布局:通过aspectRatio(1)保持正方形画布 ● 生命周期:利用onReady回调启动绘制流程 ● 居中布局:justifyContent属性实现主轴居中 完整代码:
@Component
export struct CanvasComp {
//抗锯齿设置
private settings: RenderingContextSettings = new RenderingContextSettings(true)
//创建画布实例context
private context: CanvasRenderingContext2D = new CanvasRenderingContext2D(this.settings)
//绘制图片,创建ImageBitmap对象 ,时针、分针、秒针
private panImage = new ImageBitmap("/images/ic_clock_pan.png")
private hourImage = new ImageBitmap("/images/ic_hour_pointer.png")
private minuteImage = new ImageBitmap("/images/ic_minute_pointer.png")
private secondImage = new ImageBitmap("/images/ic_second_pointer.png")
//画布参数
canvasSize = 252
//时针、分针、秒针对应的宽度
pointerWidth = 8

//绘制图像:绘制表盘+设置定时
startDraw() {
//开始画图,表盘、时针、分针、秒针
this.drawClock()
setInterval(() => {
this.drawClock()
}, 1000)
}

//绘制表盘、时针、分针、秒针
drawClock() {
//清空先前的绘图
this.context.clearRect(0, 0, this.canvasSize, this.canvasSize)
//绘制表盘
this.context.drawImage(this.panImage, 0, 0, this.canvasSize, this.canvasSize)

    //获取系统时间
    const date = new Date()
    const hour = date.getHours() + date.getMinutes() / 60 //获取系统当前小时
    const minute = date.getMinutes() //获取系统当前分钟
    const second = date.getSeconds() //获取系统当前秒

    //绘制时针
    this.drawPointer(this.hourImage, 360 * 1 / 12 * (hour % 12))

    //绘制分针
    this.drawPointer(this.minuteImage, 360 * 1 / 60 * minute)

    //绘制秒针
    this.drawPointer(this.secondImage, 360 * 1 / 60 * second)

}

//绘制表针
drawPointer(img: ImageBitmap, angle: number = 0) {
/**
* 绘制表针
  */
  this.context.save() //保存
  //设置旋转顶点
  this.context.translate(this.canvasSize / 2, this.canvasSize / 2)

  //画布、图像旋转
  this.context.rotate((180 + angle) * Math.PI / 180)

  //设置旋转中心
  this.context.translate(-this.pointerWidth / 2, -this.canvasSize / 2)

  //绘制时针
  this.context.drawImage(img, 0, 0, this.pointerWidth, this.canvasSize)

  //设置旋转中心
  this.context.translate(this.canvasSize / 2, this.canvasSize / 2)

  //重置
  this.context.restore()

}

build() {
Column() {
Canvas(this.context)
.width(this.canvasSize)
.aspectRatio(1)// .backgroundColor('#ccc')
.onReady(() => {
this.startDraw()
})
}
.height('100%')
.width('100%')
.justifyContent(FlexAlign.Center)
}
}
00
