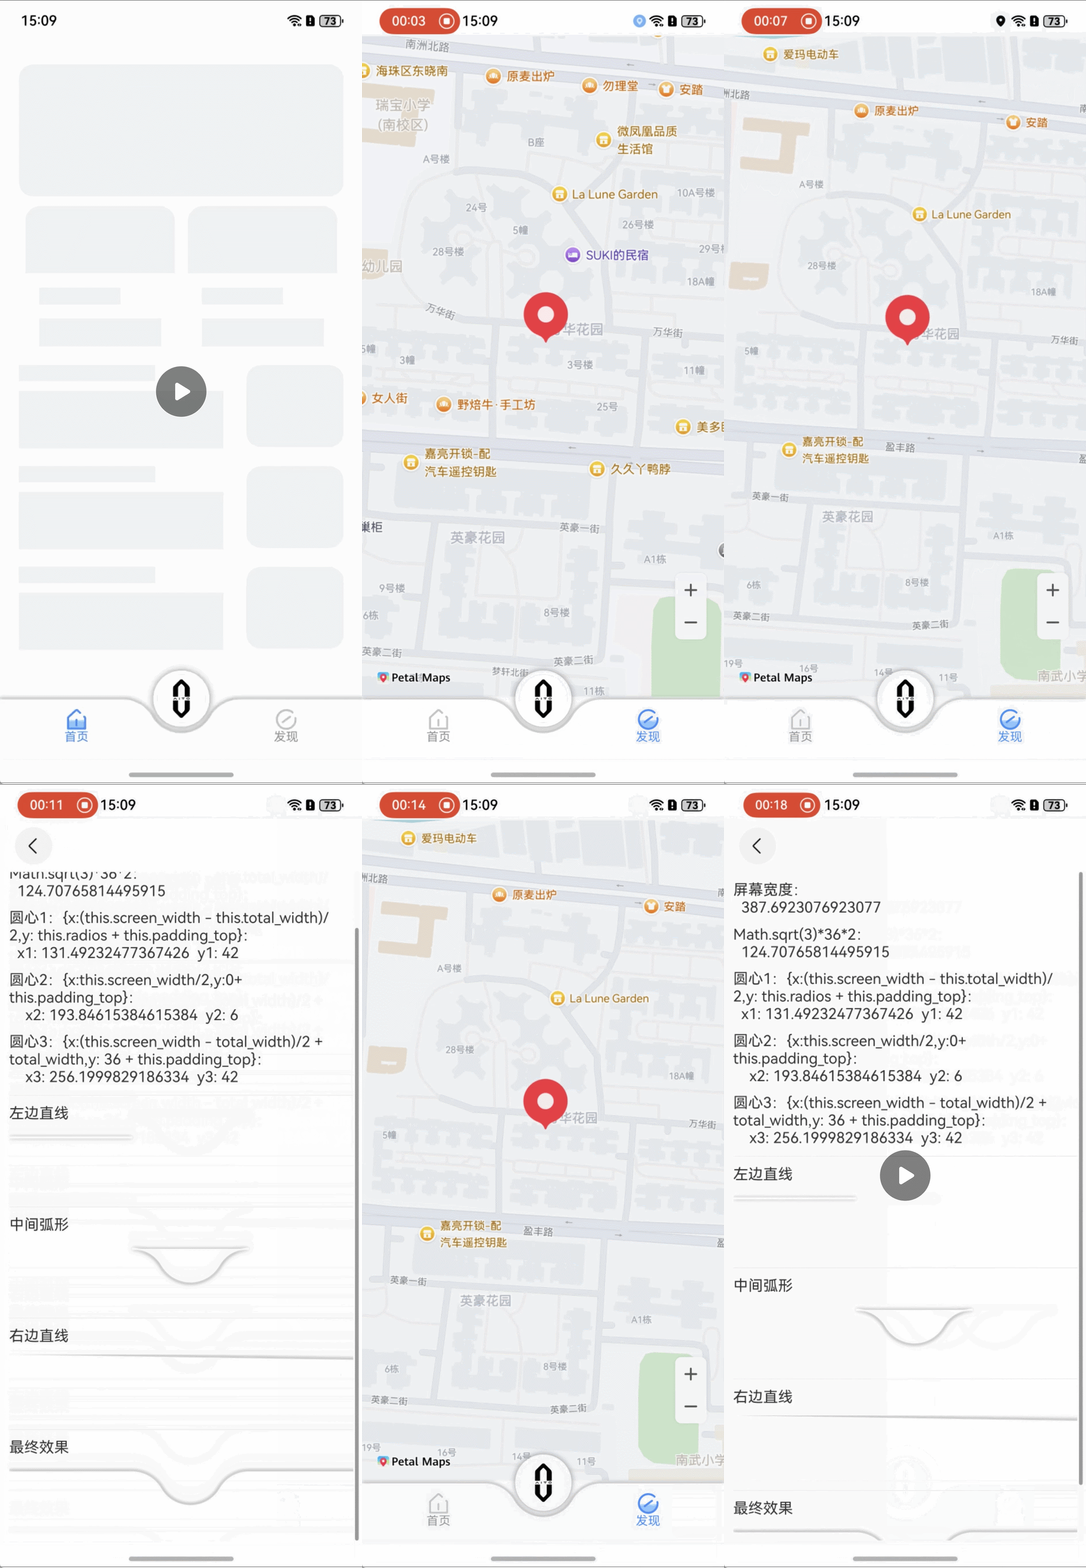
自定义Tabbar和我的位置Map和骨架图
介绍
本案例基于HarmonyOS开发,聚焦用户场景化需求,整合三大核心功能:自定义TabBar通过灵活配置底部导航栏,支持图标、文字及动态交互的个性化定制,适配多设备形态;“我的位置”地图服务集成高精度定位与实时地图渲染,结合分布式架构实现跨端位置共享,助力出行场景无缝衔接;骨架图加载优化采用智能占位布局,在数据加载时呈现内容结构预览,显著提升界面流畅度与用户感知性能。
效果图

功能介绍
Image组件或Column容器加上下面属性后,点击组件,有缩放效果
.clickEffect({ level: ClickEffectLevel.HEAVY, scale: 0.8 })
自定义Tabbar
1. 主页面布局部分代码
build() {
    Stack({alignContent:Alignment.Bottom}){
      Tabs({ barPosition: BarPosition.End, controller: this.tabsController }) {
        TabContent() {
          HomeView()
        }
        TabContent() {
          FindView()
        }
      }
      .backgroundColor(Color.White)
      .barHeight(64)
      .onChange((index) => {
        this.currentIndex = index
      })
      .animationDuration(1)
      .scrollable(false)

      Tabbar({tabItems:this.tabList,currentIndex:this.currentIndex})
    }
    .height('100%')
    .width('100%')
}
2. 主页面定义变量和函数
  @State @Watch('indexChange') currentIndex: number = 0
  @State screen_width:number = px2vp(display.getDefaultDisplaySync().width)
  private tabsController : TabsController = new TabsController()
  @State tabList:TabItem[] = [
    {image:$r('app.media.tb00'),selectImage:$r('app.media.tb01'),title:'首页'},
    {image:$r('app.media.tb10'),selectImage:$r('app.media.tb11'),title:'发现'}
  ]

  indexChange(){
    if(this.currentIndex == -1){
      router.pushUrl({
        url:'pages/AITOPage'
      })
    }else {
      this.tabsController.changeIndex(this.currentIndex)
      globalIndex = this.currentIndex
    }
  }
3. 定义全局变量,点击Logo图标跳转后,返回到原来的页面
let globalIndex:number = 0
4. Tabbar开发介绍
4.1 定义变量
@Prop tabItems:TabItem[]
@Link currentIndex:number
@State fontColor: string = '#949494'
@State selectedFontColor: string = 'rgb(61,141,255)'
// 获取屏幕宽度
@State screen_width:number = px2vp(display.getDefaultDisplaySync().width)
4.2 Tabbar布局
Stack(){
  // 凹形组件
  Rectangle()
  Row(){
    // Tabbar图标和文本
    ......
  }
  .width('100%')
  .height('100%')
  .justifyContent(FlexAlign.SpaceAround)
}
.width(px2vp(display.getDefaultDisplaySync().width))
.height(64)
4.3 凹形组件

Canvas(this.context)
  .width('100%')
  .height(70)
  .onReady(() => {
    this.context.lineWidth = 2
    this.context.fillStyle = '#ffffff'
    this.context.strokeStyle = '#ffffff'

    let total_width = Math.sqrt(3)*36*2
    let radios:number = 36
    //圆心1
    let p1:Point = {x:(this.screen_width - total_width)/2,y:radios+ this.padding_top}
    //圆心2
    let p2:Point = {x:this.screen_width/2,y:0+ this.padding_top}
    //圆心3
    let p3:Point = {x:(this.screen_width - total_width)/2 + total_width,y:36+ this.padding_top}

    this.context.moveTo(0,this.padding_top)
    this.context.lineTo((this.screen_width - total_width)/2,0 + this.padding_top)
    this.context.arc(p1.x,p1.y,radios,3.14+3.14/2,3.14+3.14/2 + 3.14/3,false)
    this.context.arc(p2.x,p2.y,radios,3.14 - 3.14/6,3.14/6,true)
    this.context.arc(p3.x,p3.y,radios,3.14 + 3.14/6,3.14 + 3.14/2,false)

    //右侧直线
    this.context.lineTo(this.screen_width,0 + this.padding_top)
    this.context.lineTo(this.screen_width,64 + this.padding_top)
    this.context.lineTo(0,64 + this.padding_top)
    this.context.lineTo(0,0 + this.padding_top)

    this.context.shadowOffsetY = 0
    this.context.shadowColor = '#949494'
    this.context.shadowBlur = 12
    this.context.stroke();
    this.context.fill()

  })
4.4 Tabbar图标和文本
if(this.tabItems.length%2 == 0 && this.tabItems.length >= 2){
  ForEach(this.tabItems,(item:TabItem,index)=>{
    if(index == this.tabItems.length/2){
        Image($r('app.media.aito_logo'))
          .width(60)
          .height(60)
          .borderRadius(30)
          .offset({ y: -30 })
          .borderWidth(4)
          .borderColor(Color.White)
          .borderStyle(BorderStyle.Solid)
          .shadow({
            radius: 20,
            color: Color.Gray,
            offsetX: 0,
            offsetY: 0
          })
          .clickEffect({ level: ClickEffectLevel.HEAVY, scale: 0.8 })
          .onClick(() => {
            const that = this
            setTimeout(() => {
              that.currentIndex = -1
            }, 500)
          })
    }
    Column(){
      Image(this.currentIndex == index? item.selectImage:item.image)
        .width(22)
        .height(22)
        .objectFit(ImageFit.Contain)
      Text(item.title)
        .fontSize(13)
        .fontColor( this.currentIndex == index? this.selectedFontColor:this.fontColor)
    }
    .width((this.screen_width - 60)/this.tabItems.length)
    .alignItems(HorizontalAlign.Center)
    .clickEffect({ level: ClickEffectLevel.HEAVY, scale: 0.8 })
    .onClick(()=>{
      this.currentIndex = index
    })
  })
}
我的位置Map组件
https://developer.huawei.com/consumer/cn/doc/harmonyos-guides/map-location
https://developer.huawei.com/consumer/cn/doc/architecture-guides/develop-app-3-0000002069297258
使用说明
使用前请先参考应用开发准备完成基本准备工作及公钥指纹配置后,参考地图服务开发指南 “配置AppGallery Connect” 章节开通地图服务,并参考应用/元服务手动签名章节对应用进行签名。
相关权限
ohos.permission.LOCATION:允许应用获取设备位置信息。
ohos.permission.APPROXIMATELY_LOCATION:允许应用获取设备模糊位置信息。
开发步骤
1. 导入地图相关服务模块。
import { abilityAccessCtrl, bundleManager, common, PermissionRequestResult, Permissions } from "@kit.AbilityKit";
import { AsyncCallback, BusinessError } from "@kit.BasicServicesKit";
import { map, mapCommon, MapComponent } from "@kit.MapKit";
import { MapUtil } from "../utils/MapUtil";
import { geoLocationManager } from "@kit.LocationKit";
2. 地图组件权限授权
2.1 module.json5文件添加
"requestPermissions": [
      {
        "name": "ohos.permission.LOCATION",
        "reason": "$string:location_permission",
        "usedScene": {
          "when": "always"
        }
      },
      {
        "name": "ohos.permission.APPROXIMATELY_LOCATION",
        "reason": "$string:fuzzy_location_permission",
        "usedScene": {
          "when": "always"
        }
      }
    ]
2.2 ArkTS授权代码
// 校验应用是否被授予定位权限,可以通过调用checkAccessToken()方法来校验当前是否已经授权。
  async checkPermissions(): Promise<boolean> {
    const permissions: Array<Permissions> = ['ohos.permission.LOCATION', 'ohos.permission.APPROXIMATELY_LOCATION'];
    for (let permission of permissions) {
      let grantStatus: abilityAccessCtrl.GrantStatus = await this.checkAccessToken(permission);
      if (grantStatus === abilityAccessCtrl.GrantStatus.PERMISSION_GRANTED) {
        // 启用我的位置图层,mapController为地图操作类对象,获取方式详见显示地图章节
        this.mapController?.setMyLocationEnabled(true);
        // 启用我的位置按钮
        this.mapController?.setMyLocationControlsEnabled(true);
        return true;
      }
    }
    return false;
  }
  async checkAccessToken(permission: Permissions): Promise<abilityAccessCtrl.GrantStatus> {
    let atManager: abilityAccessCtrl.AtManager = abilityAccessCtrl.createAtManager();
    let grantStatus: abilityAccessCtrl.GrantStatus = abilityAccessCtrl.GrantStatus.PERMISSION_DENIED;

    // 获取应用程序的accessTokenID
    let tokenId: number = 0;
    let bundleInfo: bundleManager.BundleInfo = await bundleManager.getBundleInfoForSelf(bundleManager.BundleFlag.GET_BUNDLE_INFO_WITH_APPLICATION);
    console.info('xx Succeeded in getting Bundle.');
    let appInfo: bundleManager.ApplicationInfo = bundleInfo.appInfo;
    tokenId = appInfo.accessTokenId;

    // 校验应用是否被授予权限
    grantStatus = await atManager.checkAccessToken(tokenId, permission);
    console.info('xx Succeeded in checking access token.');
    return grantStatus;
  }
  // 如果没有被授予定位权限,动态向用户申请授权
  requestPermissions(): void {
    let atManager: abilityAccessCtrl.AtManager = abilityAccessCtrl.createAtManager();
    atManager.requestPermissionsFromUser(getContext() as common.UIAbilityContext, ['ohos.permission.LOCATION', 'ohos.permission.APPROXIMATELY_LOCATION'])
      .then((data: PermissionRequestResult) => {
        // 启用我的位置图层
        this.mapController?.setMyLocationEnabled(true);
        // 启用我的位置按钮
        this.mapController?.setMyLocationControlsEnabled(true);
      })
      .catch((err: BusinessError) => {
        console.error(`xx Failed to request permissions from user. Code is ${err.code}, message is ${err.message}`);
      })
  }
3. 新建地图初始化参数mapOptions,设置地图中心点坐标及层级。
通过callback回调的方式获取MapComponentController对象,用来操作地图。
调用MapComponent组件,传入mapOptions和callback参数,初始化地图。
3.1 授权检查和初始化地图
aboutToAppear() {
    this.checkPermissions().then((flag: boolean) => {
      if (!flag) {
        this.requestPermissions()
      }
    })

    // 地图初始化参数,设置地图中心点坐标及层级
    let gcj02Position = MapUtil.convertToGcj02(23.072032264578812, 113.29466745003339)
    this.mapOptions = {
      position: {
        target: {
          latitude: gcj02Position.latitude,
          longitude: gcj02Position.longitude
        },
        zoom: 18
      }
    };

    // 地图初始化的回调
    this.callback = async (err, mapController) => {
      if (!err) {
        // 获取地图的控制器类,用来操作地图
        this.mapController = mapController;
        this.mapEventManager = this.mapController.getEventManager();
        let callback = () => {
          console.info(`xx on-mapLoad`);
          this.getLocationPosition()
        }
        this.mapEventManager.on("mapLoad", callback);
      }
    };
  }
3.2 获取当前位置
getLocationPosition() {
    let request: geoLocationManager.SingleLocationRequest = {
      locatingPriority: geoLocationManager.LocatingPriority.PRIORITY_LOCATING_SPEED,
      locatingTimeoutMs: 10000
    };
    geoLocationManager.getCurrentLocation(request).then(async (location: geoLocationManager.Location) => {
      console.log("xx geoLocationManager.getCurrentLocation:" + JSON.stringify(location))

      let gcj02Position = MapUtil.convertToGcj02(location.latitude, location.longitude)
      // 标记初始化参数
      let marketOptions: mapCommon.MarkerOptions = {
        position: {
          latitude: gcj02Position.latitude,
          longitude: gcj02Position.longitude
        }
      }
      // 创建默认标记图标。
      this.mapController?.addMarker(marketOptions)

    }).catch((err: BusinessError) => {
      console.error(`xx getCurrentLocationPosition failed, code: ${err.code}, message: ${err.message}`);
    });
  }
3.3 地图布局
build() {
    Stack() {
      // 调用MapComponent组件初始化地图
      MapComponent({ mapOptions: this.mapOptions, mapCallback: this.callback }).width('100%').height('100%');
    }.height('100%')
}
4. 地图页效果


骨架图
简单介绍一下骨架屏(Skeleton Screen)作为加载策略,具有显著的优势。首先,骨架屏能够即时反馈给用户页面正在加载中,有效缓解了因网络延迟或数据处理造成的“白屏”现象,提升了用户体验的流畅度与期待感。它以一种轻量级、占位符的形式预先展示页面结构,让用户对即将呈现的内容有所预期,减少了等待时的焦虑感。
骨架组件关键代码
  @Builder
  textArea(
    width: number | Resource | string = '100%',
    height: number | Resource | string = '100%',
    borderRadius: Length | BorderRadiuses | LocalizedBorderRadiuses = 0,
    padding: Length | Padding | LocalizedPadding = 0,
    margin: Length | Padding | LocalizedPadding = 0) {
    Row()
      .width(width)
      .height(height)
      .backgroundColor('#FFF2F3F4')
      .borderRadius(borderRadius)
      .padding(padding)
      .margin(margin)
  }
骨架组件使用
Column({space: 10}) {
  this.textArea('100%', px2vp(460), 16, 0, {top: 11})
  ......
}
效果图

总结
- Tabbar自定义组件开发
- 首页骨架屏开发
- 发现页使用Map组件,基础使用地图组件的使用
- LOGO页,显示凹形组件部分代码的显示
- 3回答
- 8粉丝
- 2关注
- 自定义组件之<六>自定义饼状图(PieChart)
- 鸿蒙开发:自定义一个任意位置弹出的Dialog
- 如何加载和使用自定义字体
- 页面和自定义组件生命周期
- HarmonyOS实战:3秒实现一个自定义轮播图
- 自定义组件之<二>自定义圆环(Ring)
- 自定义组件之<八>自定义下拉刷新(RefreshList)
- 【HarmonyOS 5】鸿蒙的装饰器原理和自定义装饰器
- 【HarmonyOS 5】鸿蒙的装饰器原理和自定义装饰器
- 自定义组件之<三>自定义标题栏(TitleBar)
- 自定义组件之<四>自定义对话框(Dialog)
- 自定义组件之<五>自定义对话框(PromptAction)
- 自定义组件之<七>自定义组件之插槽(slot)
- 214.HarmonyOS NEXT系列教程之 自定义TabBar组件系列总结与最佳实践
- 自定义组件之<一>组件语法和生命周期
