[HarmonyOS NEXT 实战案例:教育应用] 进阶篇 - 课程学习平台的交互功能与状态管理
[HarmonyOS NEXT 实战案例:教育应用] 进阶篇 - 课程学习平台的交互功能与状态管理
项目已开源,开源地址: https://gitcode.com/nutpi/HarmonyosNextCaseStudyTutorial , 欢迎fork & star
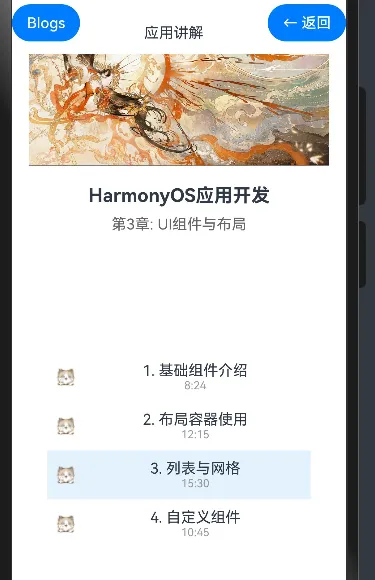
效果演示
引言
在基础篇中,我们学习了如何使用HarmonyOS NEXT的ColumnSplit组件构建课程学习平台的基本布局。在本篇进阶教程中,我们将深入探讨课程学习平台的交互功能和状态管理,包括课程切换、进度跟踪、数据绑定等高级特性。通过掌握这些进阶技巧,你将能够构建出更加实用和用户友好的课程学习平台。
状态管理概述
在HarmonyOS NEXT中,状态管理是实现交互功能的关键。在我们的课程学习平台中,主要使用了以下状态变量:
@State currentLesson: number = 0
@State currentChapter: Lesson[] = [
    { title: '1. 基础组件介绍', duration: '8:24', completed: true },
    { title: '2. 布局容器使用', duration: '12:15', completed: true },
    { title: '3. 列表与网格', duration: '15:30', completed: false },
    { title: '4. 自定义组件', duration: '10:45', completed: false }
]
这些状态变量的作用如下:
currentLesson:记录当前选中的课程索引,初始值为0(第一课)currentChapter:存储当前章节的所有课程数据,包含课程标题、时长和完成状态
数据模型与绑定
数据模型定义
在课程学习平台中,我们定义了一个接口来描述课程数据结构:
interface Lesson {
    title: string
    duration: string
    completed: boolean
}
这种清晰的数据模型定义有助于我们理解和管理应用的数据流。
数据绑定
在HarmonyOS NEXT中,数据绑定是通过状态变量和UI组件的属性绑定来实现的。以下是一些数据绑定的示例:
1. 课程列表项的选中状态
.backgroundColor(index === this.currentLesson ? '#e3f2fd' : 'transparent')
这里,我们根据index是否等于currentLesson来决定课程列表项的背景色,实现选中效果。
2. 课程完成状态图标
Image(item.completed ? $r('app.media.01') : $r('app.media.02'))
这里,我们根据item.completed来决定显示哪个图标,实现完成状态的可视化。
交互功能实现
1. 课程切换功能
课程切换功能是通过点击课程列表项来实现的:
ForEach(this.currentChapter, (item:Lesson, index) => {
    Row() {
        // 课程列表项内容
    }
    .onClick(() => this.currentLesson = index)
})
当用户点击一个课程列表项时,会执行.onClick(() => this.currentLesson = index)回调函数,更新currentLesson状态变量。由于currentLesson是一个@State装饰的状态变量,它的变化会触发UI的自动更新,从而实现课程切换功能。
具体的更新包括:
- 课程列表项的选中状态(背景色)更新
- 视频区域的内容更新(在实际应用中,这里应该加载对应的视频)
2. 上一节/下一节导航
在底部导航区域,我们添加了"上一节"和"下一节"按钮,用于在课程之间导航:
Row() {
    Button('上一节')
        .width(120)
        .height(40)
        .onClick(() => {
            if (this.currentLesson > 0) {
                this.currentLesson--;
            }
        })

    Button('下一节')
        .width(120)
        .height(40)
        .margin({ left: 20 })
        .onClick(() => {
            if (this.currentLesson < this.currentChapter.length - 1) {
                this.currentLesson++;
            }
        })
}
当用户点击"上一节"按钮时,如果当前不是第一课,则将currentLesson减1;当用户点击"下一节"按钮时,如果当前不是最后一课,则将currentLesson加1。这样,用户就可以通过这两个按钮在课程之间导航了。
3. 课程完成状态更新
在实际应用中,我们需要根据用户的学习进度更新课程的完成状态。以下是一个简单的实现:
// 标记当前课程为已完成
markCurrentLessonAsCompleted() {
    const newChapter = [...this.currentChapter];
    newChapter[this.currentLesson].completed = true;
    this.currentChapter = newChapter;
}
然后,我们可以在视频播放结束时调用这个方法:
Column() {
    Image($r('app.media.big14'))
        .width('100%')
        .height('100%')
        .objectFit(ImageFit.Cover)
        // 在实际应用中,这里应该是一个视频组件
        // 当视频播放结束时,标记当前课程为已完成
        // .onComplete(() => this.markCurrentLessonAsCompleted())
}
这样,当用户完成一个课程的学习后,该课程会被自动标记为已完成,并在列表中显示完成图标。
高级状态管理
1. 状态派生
状态派生是指根据一个或多个状态变量计算出新的值。在我们的课程学习平台中,有多处使用了状态派生:
// 根据currentLesson派生当前课程信息
const currentLesson = this.currentChapter[this.currentLesson];

// 派生课程进度
const progress = this.currentChapter.filter(lesson => lesson.completed).length / this.currentChapter.length;
状态派生使我们能够根据基本状态计算出更复杂的值,简化代码逻辑。
2. 状态更新与UI刷新
在HarmonyOS NEXT中,当@State装饰的状态变量发生变化时,框架会自动触发UI的更新。这种响应式的状态管理机制使我们能够专注于状态的变化,而不需要手动更新UI。
例如,当用户点击课程列表项时,我们只需要更新currentLesson状态:
.onClick(() => this.currentLesson = index)
框架会自动检测到currentLesson的变化,并更新所有依赖于它的UI部分,包括课程列表项的选中状态和视频区域的内容。
3. 复杂状态更新
在某些情况下,我们需要更新状态变量中的嵌套属性。例如,更新currentChapter数组中某个课程的completed属性:
markLessonAsCompleted(index: number) {
    // 创建一个新的数组,避免直接修改状态
    const newChapter = [...this.currentChapter];
    // 更新指定索引的课程的completed属性
    newChapter[index].completed = true;
    // 更新状态变量
    this.currentChapter = newChapter;
}
这里,我们首先创建了一个新的数组,然后更新指定索引的课程的completed属性,最后将新数组赋值给currentChapter状态变量。这种方式确保了状态的不可变性,避免了直接修改状态变量可能导致的问题。
实战案例:添加新功能
1. 添加课程进度条
让我们为课程学习平台添加一个课程进度条,显示当前章节的学习进度。首先,我们需要计算进度值:
// 计算当前章节的学习进度
getChapterProgress(): number {
    const completedCount = this.currentChapter.filter(lesson => lesson.completed).length;
    return completedCount / this.currentChapter.length;
}
然后,在章节信息下方添加一个进度条:
Text('第3章: UI组件与布局')
    .fontSize(16)
    .fontColor('#666666')
    .margin({ bottom: 10 })

// 进度条
Row() {
    Progress({ value: this.getChapterProgress() * 100, total: 100, type: ProgressType.Linear })
        .width('80%')
        .height(10)
        .color('#4CAF50')

    Text(`${Math.round(this.getChapterProgress() * 100)}%`)
        .fontSize(14)
        .fontColor('#666666')
        .margin({ left: 10 })
}
.width('100%')
.margin({ bottom: 20 })
这样,用户就可以直观地看到当前章节的学习进度了。
2. 添加课程笔记功能
让我们为课程学习平台添加一个课程笔记功能,允许用户为每个课程添加笔记。首先,我们需要在Lesson接口中添加一个notes字段:
interface Lesson {
    title: string
    duration: string
    completed: boolean
    notes: string  // 新增字段
}
然后,在课程详情区域添加一个笔记编辑器:
// 在课程列表下方添加笔记编辑器
Column() {
    Text('课程笔记')
        .fontSize(16)
        .fontWeight(FontWeight.Bold)
        .margin({ top: 20, bottom: 10 })

    TextArea({ placeholder: '在这里添加笔记...', text: this.currentChapter[this.currentLesson].notes })
        .width('100%')
        .height(100)
        .onChange((value: string) => {
            const newChapter = [...this.currentChapter];
            newChapter[this.currentLesson].notes = value;
            this.currentChapter = newChapter;
        })
}
.width('100%')
这样,用户就可以为每个课程添加笔记,并在切换课程时自动保存和加载笔记了。
组件封装
为了提高代码的可复用性和可维护性,我们可以将一些常用的UI部分封装为自定义组件。
1. 课程列表项组件
@Component
struct LessonItem {
    @Prop lesson: Lesson
    @Prop index: number
    @Link currentLesson: number

    build() {
        Row() {
            Image(this.lesson.completed ? $r('app.media.01') : $r('app.media.02'))
                .width(20)
                .height(20)
                .margin({ right: 15 })

            Column() {
                Text(this.lesson.title)
                    .fontSize(16)
                Text(this.lesson.duration)
                    .fontSize(12)
                    .fontColor('#999999')
            }
            .layoutWeight(1)
        }
        .padding(10)
        .backgroundColor(this.index === this.currentLesson ? '#e3f2fd' : 'transparent')
        .onClick(() => this.currentLesson = this.index)
    }
}
然后,在主组件中使用这个自定义组件:
ForEach(this.currentChapter, (item:Lesson, index) => {
    LessonItem({ lesson: item, index: index, currentLesson: $currentLesson })
})
2. 导航按钮组件
@Component
struct NavigationButton {
    @Prop text: string
    @Prop disabled: boolean
    onTap: () => void

    build() {
        Button(this.text)
            .width(120)
            .height(40)
            .enabled(!this.disabled)
            .opacity(this.disabled ? 0.5 : 1)
            .onClick(() => this.onTap())
    }
}
然后,在主组件中使用这个自定义组件:
Row() {
    NavigationButton({
        text: '上一节',
        disabled: this.currentLesson <= 0,
        onTap: () => {
            if (this.currentLesson > 0) {
                this.currentLesson--;
            }
        }
    })
    .margin({ right: 20 })

    NavigationButton({
        text: '下一节',
        disabled: this.currentLesson >= this.currentChapter.length - 1,
        onTap: () => {
            if (this.currentLesson < this.currentChapter.length - 1) {
                this.currentLesson++;
            }
        }
    })
}
小结
在本教程中,我们深入探讨了课程学习平台的交互功能和状态管理。通过使用@State装饰器定义状态变量,我们实现了课程切换、进度跟踪等交互功能。我们还学习了状态派生、状态更新与UI刷新、复杂状态更新等高级状态管理技巧,以及如何添加课程进度条和笔记功能。
