139.[HarmonyOS NEXT 实战案例八:List系列] 滑动操作列表组件实战:打造高效待办事项应用 基础篇
[HarmonyOS NEXT 实战案例八:List系列] 滑动操作列表组件实战:打造高效待办事项应用 基础篇
项目已开源,开源地址: https://gitcode.com/nutpi/HarmonyosNextCaseStudyTutorial , 欢迎fork & star
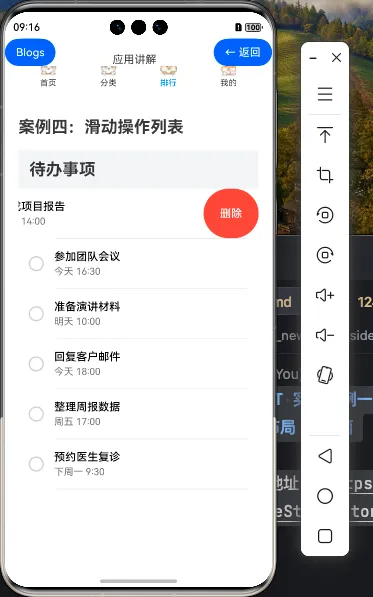
效果演示
一、滑动操作列表概述
滑动操作列表是移动应用中常见的交互模式,通过横向滑动列表项可以显示隐藏在列表项后面的操作按钮,如删除、编辑、收藏等。这种交互方式可以在不占用界面空间的情况下,提供丰富的操作选项,使界面更加简洁高效。
在HarmonyOS NEXT中,我们可以通过List组件和ListItem组件的swipeAction属性来实现滑动操作列表。本教程将以待办事项应用为例,详细讲解如何创建基础的滑动操作列表。
1.1 滑动操作列表的特点
| 特点 | 说明 |
|---|---|
| 节省空间 | 操作按钮隐藏在列表项后面,不占用界面空间 |
| 交互直观 | 用户通过自然的滑动手势即可触发操作 |
| 操作丰富 | 可以在滑动区域放置多个操作按钮 |
| 自定义灵活 | 可以自定义滑动区域的宽度、颜色和内容 |
1.2 滑动操作列表的应用场景
| 应用场景 | 示例 |
|---|---|
| 待办事项管理 | 滑动显示完成、删除按钮 |
| 邮件列表 | 滑动显示删除、标记、归档按钮 |
| 聊天消息列表 | 滑动显示删除、转发、收藏按钮 |
| 购物车列表 | 滑动显示删除、收藏按钮 |
二、待办事项应用的数据模型
在开始实现滑动操作列表之前,我们需要定义待办事项的数据模型。
2.1 待办事项数据结构
// 待办事项类型定义
export class TodoItem {
  // 唯一标识符
  id: number = 0
  // 待办事项标题
  title: string = ''
  // 待办事项描述
  description: string = ''
  // 是否已完成
  completed: boolean = false
  // 创建时间
  createTime: Date = new Date()
  // 截止时间(可选)
  dueDate?: Date

  constructor(id: number, title: string, description: string = '', completed: boolean = false, dueDate?: Date) {
    this.id = id
    this.title = title
    this.description = description
    this.completed = completed
    this.createTime = new Date()
    this.dueDate = dueDate
  }
}
2.2 待办事项数据准备
// 示例待办事项数据
export const todoData: TodoItem[] = [
  new TodoItem(1, '完成HarmonyOS NEXT学习', '学习ArkTS和HarmonyOS NEXT的基础知识', false, new Date(2023, 5, 30)),
  new TodoItem(2, '准备项目演示', '准备下周项目演示的PPT和演示文稿', false, new Date(2023, 6, 5)),
  new TodoItem(3, '健身', '去健身房锻炼1小时', false, new Date(2023, 6, 1)),
  new TodoItem(4, '购物', '购买生活必需品', true),
  new TodoItem(5, '阅读书籍', '阅读《设计模式》第3章', false, new Date(2023, 6, 10)),
  new TodoItem(6, '写周报', '总结本周工作内容,编写周报', false, new Date(2023, 6, 2)),
  new TodoItem(7, '修复应用Bug', '修复应用中的已知Bug', false),
  new TodoItem(8, '参加会议', '参加团队周会', true),
  new TodoItem(9, '学习新技术', '学习React Native开发', false, new Date(2023, 6, 15)),
  new TodoItem(10, '整理文档', '整理项目文档并更新', false)
]
三、基础滑动操作列表实现
接下来,我们将实现一个基础的待办事项滑动操作列表,包括完成和删除操作。
3.1 页面结构设计
@Entry
@Component
struct SwipeActionList {
  // 待办事项数据
  @State todoItems: TodoItem[] = todoData

  build() {
    Column() {
      // 标题栏
      this.TitleBar()

      // 待办事项列表
      this.TodoList()
    }
    .width('100%')
    .height('100%')
    .backgroundColor('#F1F3F5')
  }

  @Builder TitleBar() {
    Row() {
      Text('待办事项')
        .fontSize(24)
        .fontWeight(FontWeight.Bold)
        .layoutWeight(1)

      Button() {
        Image($r('app.media.ic_add'))
          .width(24)
          .height(24)
      }
      .width(40)
      .height(40)
      .backgroundColor('#007DFF')
      .borderRadius(20)
      .onClick(() => {
        // 添加新待办事项的逻辑
      })
    }
    .width('100%')
    .height(56)
    .padding({ left: 16, right: 16 })
    .backgroundColor('#FFFFFF')
  }

  @Builder TodoList() {
    List() {
      ForEach(this.todoItems, (item: TodoItem) => {
        ListItem() {
          this.TodoItemView(item)
        }
        .swipeAction({ end: this.getSwipeActionButtons(item) })
      })
    }
    .width('100%')
    .layoutWeight(1)
    .divider({ strokeWidth: 1, color: '#E5E5E5', startMargin: 16, endMargin: 16 })
  }

  @Builder TodoItemView(item: TodoItem) {
    Row() {
      // 完成状态复选框
      Toggle({ type: ToggleType.Checkbox, isOn: item.completed })
        .width(24)
        .height(24)
        .margin({ right: 16 })
        .onChange((isOn: boolean) => {
          // 更新待办事项完成状态
          this.updateTodoStatus(item.id, isOn)
        })

      // 待办事项内容
      Column() {
        // 标题
        Text(item.title)
          .fontSize(16)
          .fontWeight(FontWeight.Medium)
          .decoration({ type: item.completed ? TextDecorationType.LineThrough : TextDecorationType.None })
          .fontColor(item.completed ? '#999999' : '#333333')

        // 描述(如果有)
        if (item.description) {
          Text(item.description)
            .fontSize(14)
            .fontColor('#666666')
            .margin({ top: 4 })
            .maxLines(1)
            .textOverflow({ overflow: TextOverflow.Ellipsis })
        }

        // 截止日期(如果有)
        if (item.dueDate) {
          Text(this.formatDate(item.dueDate))
            .fontSize(12)
            .fontColor(this.isOverdue(item.dueDate) ? '#FF0000' : '#999999')
            .margin({ top: 4 })
        }
      }
      .layoutWeight(1)
      .alignItems(HorizontalAlign.Start)
    }
    .width('100%')
    .padding(16)
    .backgroundColor('#FFFFFF')
  }

  @Builder getSwipeActionButtons(item: TodoItem) {
    Row() {
      // 完成/取消完成按钮
      Button() {
        Column() {
          Image(item.completed ? $r('app.media.ic_undo') : $r('app.media.ic_check'))
            .width(24)
            .height(24)

          Text(item.completed ? '取消' : '完成')
            .fontSize(10)
            .fontColor('#FFFFFF')
            .margin({ top: 4 })
        }
        .width('100%')
        .height('100%')
        .justifyContent(FlexAlign.Center)
      }
      .width(80)
      .height('100%')
      .backgroundColor(item.completed ? '#FF9800' : '#4CAF50')
      .onClick(() => {
        // 更新待办事项完成状态
        this.updateTodoStatus(item.id, !item.completed)
      })

      // 删除按钮
      Button() {
        Column() {
          Image($r('app.media.ic_delete'))
            .width(24)
            .height(24)

          Text('删除')
            .fontSize(10)
            .fontColor('#FFFFFF')
            .margin({ top: 4 })
        }
        .width('100%')
        .height('100%')
        .justifyContent(FlexAlign.Center)
      }
      .width(80)
      .height('100%')
      .backgroundColor('#FF0000')
      .onClick(() => {
        // 删除待办事项
        this.deleteTodoItem(item.id)
      })
    }
  }

  // 更新待办事项完成状态
  private updateTodoStatus(id: number, completed: boolean) {
    let index = this.todoItems.findIndex(item => item.id === id)
    if (index !== -1) {
      this.todoItems[index].completed = completed
      // 使用数组拷贝触发UI更新
      this.todoItems = [...this.todoItems]
    }
  }

  // 删除待办事项
  private deleteTodoItem(id: number) {
    this.todoItems = this.todoItems.filter(item => item.id !== id)
  }

  // 格式化日期
  private formatDate(date: Date): string {
    return `${date.getFullYear()}-${(date.getMonth() + 1).toString().padStart(2, '0')}-${date.getDate().toString().padStart(2, '0')}`
  }

  // 检查是否过期
  private isOverdue(date: Date): boolean {
    return date < new Date()
  }
}
3.2 滑动操作按钮实现
在上面的代码中,我们通过ListItem的swipeAction属性实现了滑动操作功能。swipeAction属性接受一个对象,可以设置start和end属性,分别表示列表项左侧和右侧的滑动操作区域。
.swipeAction({ end: this.getSwipeActionButtons(item) })
在getSwipeActionButtons方法中,我们定义了两个操作按钮:
- 完成/取消完成按钮:根据待办事项的完成状态显示不同的图标和文本,点击后切换完成状态
- 删除按钮:点击后删除待办事项
@Builder getSwipeActionButtons(item: TodoItem) {
  Row() {
    // 完成/取消完成按钮
    Button() {
      Column() {
        Image(item.completed ? $r('app.media.ic_undo') : $r('app.media.ic_check'))
          .width(24)
          .height(24)

        Text(item.completed ? '取消' : '完成')
          .fontSize(10)
          .fontColor('#FFFFFF')
          .margin({ top: 4 })
      }
      .width('100%')
      .height('100%')
      .justifyContent(FlexAlign.Center)
    }
    .width(80)
    .height('100%')
    .backgroundColor(item.completed ? '#FF9800' : '#4CAF50')
    .onClick(() => {
      // 更新待办事项完成状态
      this.updateTodoStatus(item.id, !item.completed)
    })

    // 删除按钮
    Button() {
      Column() {
        Image($r('app.media.ic_delete'))
          .width(24)
          .height(24)

        Text('删除')
          .fontSize(10)
          .fontColor('#FFFFFF')
          .margin({ top: 4 })
      }
      .width('100%')
      .height('100%')
      .justifyContent(FlexAlign.Center)
    }
    .width(80)
    .height('100%')
    .backgroundColor('#FF0000')
    .onClick(() => {
      // 删除待办事项
      this.deleteTodoItem(item.id)
    })
  }
}
3.3 待办事项状态管理
在代码中,我们使用了两个方法来管理待办事项的状态:
- updateTodoStatus:更新待办事项的完成状态
private updateTodoStatus(id: number, completed: boolean) {
  let index = this.todoItems.findIndex(item => item.id === id)
  if (index !== -1) {
    this.todoItems[index].completed = completed
    // 使用数组拷贝触发UI更新
    this.todoItems = [...this.todoItems]
  }
}
- deleteTodoItem:删除待办事项
private deleteTodoItem(id: number) {
  this.todoItems = this.todoItems.filter(item => item.id !== id)
}
这两个方法都会更新todoItems状态变量,从而触发UI更新。
四、滑动操作列表的关键属性
4.1 swipeAction属性
ListItem组件的swipeAction属性是实现滑动操作列表的核心。它接受一个对象,可以设置以下属性:
| 属性 | 类型 | 说明 |
|---|---|---|
| start | @Builder | 列表项左侧的滑动操作区域 |
| end | @Builder | 列表项右侧的滑动操作区域 |
| edgeEffect | SwipeEdgeEffect | 滑动到边缘的效果,可选值:Spring(弹性效果)、None(无效果) |
在我们的示例中,我们只使用了end属性,实现了从右向左滑动显示操作按钮的效果。
4.2 滑动操作区域的设计
在设计滑动操作区域时,需要注意以下几点:
- 操作按钮的宽度:操作按钮的宽度决定了滑动区域的宽度,应该根据按钮的内容和数量合理设置
- 操作按钮的颜色:操作按钮的颜色应该与操作的性质相符,例如删除按钮使用红色,完成按钮使用绿色
- 操作按钮的内容:操作按钮应该包含图标和文本,使用户能够清楚地了解按钮的功能
五、完整代码分析
让我们对完整的代码进行分析,了解滑动操作列表的实现原理。
5.1 代码结构
| 部分 | 说明 |
|---|---|
| 数据模型 | 定义了TodoItem类和示例数据 |
| 页面结构 | 包括标题栏和待办事项列表 |
| 列表项视图 | 定义了待办事项的显示方式 |
| 滑动操作按钮 | 定义了滑动操作区域的内容 |
| 状态管理方法 | 实现了待办事项的状态更新和删除 |
| 辅助方法 | 实现了日期格式化和过期检查 |
5.2 关键实现点
- 使用ListItem的swipeAction属性实现滑动操作功能
- 使用@Builder方法创建可复用的UI组件
- 使用状态变量和状态更新方法管理待办事项数据
- 根据待办事项的完成状态动态调整UI显示
总结
在本篇教程中,我们学习了如何使用HarmonyOS NEXT的List和ListItem组件创建基础的滑动操作列表。我们以待办事项应用为例,实现了完成和删除操作,并了解了滑动操作列表的关键属性和设计原则。在下一篇教程中,我们将深入探讨滑动操作列表的进阶特性,包括自定义滑动效果、滑动阈值设置、滑动事件监听等,帮助你构建更加强大和灵活的滑动操作列表。
