160.[HarmonyOS NEXT 实战案例二:Grid] 照片相册网格布局:基础篇
2025-06-30 22:41:46
275次阅读
0个评论
[HarmonyOS NEXT 实战案例二:Grid] 照片相册网格布局:基础篇
项目已开源,开源地址: https://gitcode.com/nutpi/HarmonyosNextCaseStudyTutorial , 欢迎fork & star
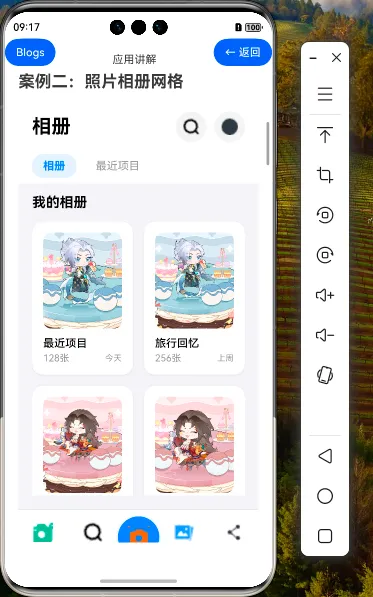
效果演示

1. Grid 组件与照片相册应用场景
1.1 Grid 组件概述
Grid 组件是 HarmonyOS NEXT 中用于实现网格布局的容器组件,它通过行和列划分页面,使得页面布局更加灵活、简洁、易于维护。Grid 组件与 GridItem 子组件配合使用,可以构建出各种复杂的网格布局界面。
1.2 Grid 与 GridItem 的关系
- Grid:作为容器组件,用于设置网格布局的相关参数,如行列数量、间距等
- GridItem:作为子组件,定义网格中每个单元格的内容和特征
1.3 照片相册应用场景
照片相册是 Grid 组件的典型应用场景之一,具有以下特点:
| 特点 | 描述 |
|---|---|
| 多列展示 | 照片相册通常需要在有限空间内展示多张照片,网格布局可以高效利用屏幕空间 |
| 不同布局需求 | 相册列表和照片列表可能需要不同的列数和间距设置 |
| 交互操作 | 需要支持点击查看、选择等交互操作 |
| 信息展示 | 除了照片外,还需要展示相册名称、照片数量、日期等信息 |
2. 照片相册应用数据模型
在我们的照片相册应用中,定义了两个主要的数据模型:
2.1 相册数据模型
interface Album {
    id: number,
    name: string,
    count: number,
    cover: Resource,
    date: string
}
相册数据模型包含以下字段:
- id:相册唯一标识
- name:相册名称
- count:相册中的照片数量
- cover:相册封面图片
- date:相册创建或更新日期
2.2 照片数据模型
interface Recentphoto {
    id: number,
    image: Resource,
    date: string,
    location?: string
}
照片数据模型包含以下字段:
- id:照片唯一标识
- image:照片资源
- date:照片拍摄日期时间
- location:照片拍摄地点(可选字段)
3. 照片相册应用页面结构
我们的照片相册应用由以下几个主要部分组成:
3.1 页面整体结构
build() {
    Column() {
        // 顶部导航栏
        // 标签切换
        // 内容区域(相册视图或最近项目视图)
        // 底部工具栏
    }
    .width('100%')
    .height('100%')
    .backgroundColor('#F2F2F7')
}
整个页面采用 Column 容器进行垂直布局,包含四个主要部分。
3.2 顶部导航栏
// 顶部导航栏
Row() {
    Text('相册')
        .fontSize(28)
        .fontWeight(FontWeight.Bold)
        .fontColor('#000000')

    Blank()

    Button() {
        Image($r('app.media.search_icon'))
            .width(24)
            .height(24)
    }
    .width(44)
    .height(44)
    .borderRadius(22)
    .backgroundColor('rgba(0, 0, 0, 0.05)')

    Button() {
        Image($r('app.media.more_icon'))
            .width(24)
            .height(24)
    }
    .width(44)
    .height(44)
    .borderRadius(22)
    .backgroundColor('rgba(0, 0, 0, 0.05)')
    .margin({ left: 12 })
}
.width('100%')
.padding({ left: 20, right: 20, top: 10, bottom: 10 })
.backgroundColor('#FFFFFF')
顶部导航栏包含应用标题和两个功能按钮(搜索和更多选项)。
3.3 标签切换
// 标签切换
Row() {
    Text('相册')
        .fontSize(16)
        .fontWeight(this.currentTab === 0 ? FontWeight.Bold : FontWeight.Normal)
        .fontColor(this.currentTab === 0 ? '#007AFF' : '#8E8E93')
        .padding({ left: 16, right: 16, top: 8, bottom: 8 })
        .borderRadius(16)
        .backgroundColor(this.currentTab === 0 ? 'rgba(0, 122, 255, 0.1)' : 'transparent')
        .onClick(() => {
            this.currentTab = 0
        })

    Text('最近项目')
        .fontSize(16)
        .fontWeight(this.currentTab === 1 ? FontWeight.Bold : FontWeight.Normal)
        .fontColor(this.currentTab === 1 ? '#007AFF' : '#8E8E93')
        .padding({ left: 16, right: 16, top: 8, bottom: 8 })
        .borderRadius(16)
        .backgroundColor(this.currentTab === 1 ? 'rgba(0, 122, 255, 0.1)' : 'transparent')
        .margin({ left: 12 })
        .onClick(() => {
            this.currentTab = 1
        })
}
.width('100%')
.padding({ left: 20, right: 20, top: 8, bottom: 8 })
.backgroundColor('#FFFFFF')
标签切换部分使用两个 Text 组件实现,通过 currentTab 状态变量控制当前选中的标签样式。
4. Grid 网格布局实现
4.1 相册视图(2列布局)
// 相册视图 - 2列布局
Column() {
    Text('我的相册')
        .fontSize(20)
        .fontWeight(FontWeight.Bold)
        .fontColor('#000000')
        .alignSelf(ItemAlign.Start)
        .margin({ bottom: 16 })

    Grid() {
        ForEach(this.albums, (album:Album) => {
            GridItem() {
                Column() {
                    // 相册封面
                    Image(album.cover)
                        .width('100%')
                        .height(140)
                        .objectFit(ImageFit.Cover)
                        .borderRadius(12)

                    // 相册信息
                    Column() {
                        Text(album.name)
                            .fontSize(16)
                            .fontWeight(FontWeight.Medium)
                            .fontColor('#000000')
                            .maxLines(1)
                            .textOverflow({ overflow: TextOverflow.Ellipsis })

                        Row() {
                            Text(`${album.count}张`)
                                .fontSize(14)
                                .fontColor('#8E8E93')

                            Blank()

                            Text(album.date)
                                .fontSize(12)
                                .fontColor('#8E8E93')
                        }
                        .width('100%')
                        .margin({ top: 4 })
                    }
                    .alignItems(HorizontalAlign.Start)
                    .width('100%')
                    .margin({ top: 12 })
                }
                .width('100%')
                .padding(16)
                .backgroundColor('#FFFFFF')
                .borderRadius(16)
                .shadow({
                    radius: 8,
                    color: 'rgba(0, 0, 0, 0.08)',
                    offsetX: 0,
                    offsetY: 2
                })
            }
            .onClick(() => {
                console.log(`打开相册: ${album.name}`)
            })
        })
    }
    .columnsTemplate('1fr 1fr') // 2列布局
    .columnsGap(16)
    .rowsGap(16)
    .width('100%')
    .layoutWeight(1)
}
.width('100%')
.layoutWeight(1)
.padding({ left: 20, right: 20, top: 16, bottom: 20 })
.backgroundColor('#F2F2F7')
相册视图使用 Grid 组件实现 2 列布局,每个 GridItem 包含相册封面和相册信息。
4.2 最近项目视图(3列布局)
// 最近项目视图 - 3列布局
Column() {
    Row() {
        Text('最近添加')
            .fontSize(20)
            .fontWeight(FontWeight.Bold)
            .fontColor('#000000')

        Blank()

        Text('选择')
            .fontSize(16)
            .fontColor('#007AFF')
    }
    .width('100%')
    .margin({ bottom: 16 })

    Grid() {
        ForEach(this.recentPhotos, (photo:Recentphoto) => {
            GridItem() {
                Stack({ alignContent: Alignment.BottomStart }) {
                    Image(photo.image)
                        .width('100%')
                        .height(120)
                        .objectFit(ImageFit.Cover)
                        .borderRadius(8)

                    // 位置信息覆盖层
                    if (photo.location) {
                        Row() {
                            Image($r('app.media.location_icon'))
                                .width(12)
                                .height(12)
                                .fillColor('#FFFFFF')

                            Text(photo.location)
                                .fontSize(10)
                                .fontColor('#FFFFFF')
                                .margin({ left: 4 })
                        }
                        .padding({ left: 6, right: 6, top: 4, bottom: 4 })
                        .backgroundColor('rgba(0, 0, 0, 0.6)')
                        .borderRadius(8)
                        .margin({ left: 8, bottom: 8 })
                    }
                }
                .width('100%')
                .height(120)
            }
            .onClick(() => {
                console.log(`查看照片: ${photo.id}`)
            })
        })
    }
    .columnsTemplate('1fr 1fr 1fr') // 3列布局
    .columnsGap(4)
    .rowsGap(4)
    .width('100%')
    .layoutWeight(1)
}
.width('100%')
.layoutWeight(1)
.padding({ left: 20, right: 20, top: 16, bottom: 20 })
.backgroundColor('#F2F2F7')
最近项目视图使用 Grid 组件实现 3 列布局,每个 GridItem 包含照片和可选的位置信息覆盖层。
4.3 底部工具栏
// 底部工具栏
Row() {
    Column() {
        Image($r('app.media.photos_icon'))
            .width(28)
            .height(28)
            .fillColor('#007AFF')

        Text('照片')
            .fontSize(10)
            .fontColor('#007AFF')
            .margin({ top: 2 })
    }
    .layoutWeight(1)

    Column() {
        Image($r('app.media.search_icon'))
            .width(28)
            .height(28)
            .fillColor('#8E8E93')

        Text('搜索')
            .fontSize(10)
            .fontColor('#8E8E93')
            .margin({ top: 2 })
    }
    .layoutWeight(1)

    // 拍照按钮
    Button() {
        Image($r('app.media.camera_icon'))
            .width(32)
            .height(32)
            .fillColor('#FFFFFF')
    }
    .width(60)
    .height(60)
    .borderRadius(30)
    .backgroundColor('#007AFF')
    .shadow({
        radius: 12,
        color: 'rgba(0, 122, 255, 0.3)',
        offsetX: 0,
        offsetY: 4
    })

    Column() {
        Image($r('app.media.album_icon'))
            .width(28)
            .height(28)
            .fillColor('#8E8E93')

        Text('相册')
            .fontSize(10)
            .fontColor('#8E8E93')
            .margin({ top: 2 })
    }
    .layoutWeight(1)

    Column() {
        Image($r('app.media.share_icon'))
            .width(28)
            .height(28)
            .fillColor('#8E8E93')

        Text('分享')
            .fontSize(10)
            .fontColor('#8E8E93')
            .margin({ top: 2 })
    }
    .layoutWeight(1)
}
.width('100%')
.height(80)
.padding({ top: 8, bottom: 8 })
.backgroundColor('#FFFFFF')
.borderColor('#E5E5EA')
.borderWidth({ top: 1 })
底部工具栏包含五个功能按钮,中间的拍照按钮使用了特殊的样式设计。
5. Grid 组件关键属性解析
5.1 Grid 容器属性
| 属性 | 说明 | 示例 |
|---|---|---|
| columnsTemplate | 设置网格布局列的数量和尺寸占比 | '1fr 1fr' 表示两列等宽布局 |
| rowsTemplate | 设置网格布局行的数量和尺寸占比 | '1fr 1fr 1fr' 表示三行等高布局 |
| columnsGap | 设置列间距 | columnsGap(16) 设置列间距为16像素 |
| rowsGap | 设置行间距 | rowsGap(16) 设置行间距为16像素 |
| layoutDirection | 设置网格布局的主轴方向 | GridDirection.Row 或 GridDirection.Column |
5.2 GridItem 子项属性
| 属性 | 说明 | 示例 |
|---|---|---|
| rowStart | 设置子组件起始行号 | rowStart(1) 从第1行开始 |
| rowEnd | 设置子组件结束行号 | rowEnd(3) 到第3行结束 |
| columnStart | 设置子组件起始列号 | columnStart(2) 从第2列开始 |
| columnEnd | 设置子组件结束列号 | columnEnd(4) 到第4列结束 |
6. 布局技巧与最佳实践
6.1 相册卡片设计
相册卡片采用了以下设计技巧:
- 阴影效果:使用 shadow 属性为卡片添加轻微阴影,增强立体感
- 圆角处理:使用 borderRadius 属性为卡片和图片添加圆角,提升视觉美感
- 信息布局:相册名称和信息采用垂直布局,照片数量和日期采用水平布局并使用 Blank 组件实现两端对齐
6.2 网格间距优化
不同视图采用了不同的网格间距设置:
- 相册视图:较大的间距
columnsGap(16)和rowsGap(16),突出每个相册的独立性 - 照片视图:较小的间距
columnsGap(4)和rowsGap(4),使照片排列更加紧凑,展示更多内容
6.3 响应式设计考虑
虽然当前实现使用了固定的列数设置,但可以通过以下方式增强响应式能力:
// 根据屏幕宽度动态调整列数
let columnsTemplate = '1fr 1fr';
if (screenWidth >= 600) {
  columnsTemplate = '1fr 1fr 1fr';
}
if (screenWidth >= 840) {
  columnsTemplate = '1fr 1fr 1fr 1fr';
}

Grid() {
  // 子项...
}
.columnsTemplate(columnsTemplate)
7. 总结
在下一篇教程中,我们将深入探讨照片相册应用的进阶功能,包括状态管理、交互优化和动画效果等内容。
00
- 0回答
- 5粉丝
- 0关注
