[HarmonyOS NEXT 实战案例二:SideBarContainer] 侧边栏容器实战:电商应用商品筛选侧边栏 进阶篇
[HarmonyOS NEXT 实战案例二:SideBarContainer] 侧边栏容器实战:电商应用商品筛选侧边栏 进阶篇
项目已开源,开源地址: https://gitcode.com/nutpi/HarmonyosNextCaseStudyTutorial , 欢迎fork & star
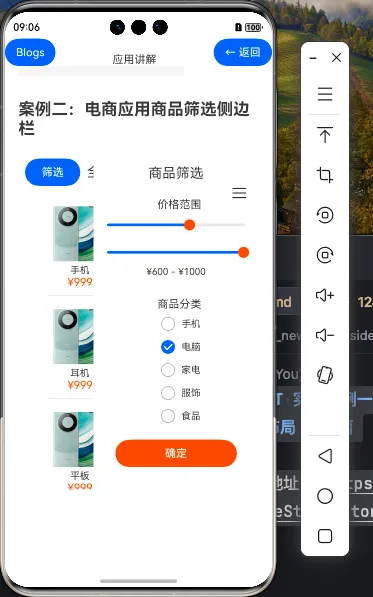
效果演示
一、状态管理进阶
在基础篇中,我们已经实现了电商应用商品筛选侧边栏的基本布局和功能。在本篇教程中,我们将深入探讨如何通过状态管理和数据绑定,实现更加复杂的交互功能,提升用户体验。
1.1 状态变量设计
在电商应用中,状态管理是实现复杂交互的关键。我们需要设计合理的状态变量来管理筛选条件和商品数据。
@Component
export struct ShoppingApp {
    // 侧边栏状态
    @State isSideBarShow: boolean = false

    // 筛选条件状态
    @State priceRange: number[] = [0, 1000]
    @State selectedCategories: string[] = []
    @State selectedBrands: string[] = []
    @State minRating: number = 0
    @State sortBy: string = 'default'  // 'default', 'priceAsc', 'priceDesc', 'newest'

    // 商品数据状态
    @State products: Product[] = []
    @State filteredProducts: Product[] = []
    @State isLoading: boolean = false

    // 其他状态
    @State isFilterChanged: boolean = false  // 标记筛选条件是否已更改但未应用

    // ...
}
1.2 数据模型定义
为了更好地管理商品数据,我们需要定义清晰的数据模型:
// 商品数据模型
class Product {
    id: string
    name: string
    category: string
    brand: string
    price: number
    rating: number
    imageUrl: string
    createdAt: Date

    constructor(id: string, name: string, category: string, brand: string,
                price: number, rating: number, imageUrl: string) {
        this.id = id
        this.name = name
        this.category = category
        this.brand = brand
        this.price = price
        this.rating = rating
        this.imageUrl = imageUrl
        this.createdAt = new Date()
    }
}

// 筛选条件模型
class FilterOptions {
    priceRange: number[] = [0, 1000]
    categories: string[] = []
    brands: string[] = []
    minRating: number = 0
    sortBy: string = 'default'

    constructor(options?: Partial<FilterOptions>) {
        if (options) {
            Object.assign(this, options)
        }
    }

    // 判断筛选条件是否为默认值
    isDefault(): boolean {
        return this.priceRange[0] === 0 &&
               this.priceRange[1] === 1000 &&
               this.categories.length === 0 &&
               this.brands.length === 0 &&
               this.minRating === 0 &&
               this.sortBy === 'default'
    }

    // 获取已应用的筛选条件数量
    getAppliedCount(): number {
        let count = 0
        if (this.priceRange[0] > 0 || this.priceRange[1] < 1000) count++
        count += this.categories.length
        count += this.brands.length
        if (this.minRating > 0) count++
        if (this.sortBy !== 'default') count++
        return count
    }

    // 创建筛选条件的副本
    clone(): FilterOptions {
        return new FilterOptions({
            priceRange: [...this.priceRange],
            categories: [...this.categories],
            brands: [...this.brands],
            minRating: this.minRating,
            sortBy: this.sortBy
        })
    }
}
1.3 模拟数据生成
在实际开发中,商品数据通常来自后端API。在本教程中,我们使用模拟数据进行演示:
// 生成模拟商品数据
private generateMockProducts(): Product[] {
    const categories = ['手机', '电脑', '家电', '服饰', '食品']
    const brands = ['品牌A', '品牌B', '品牌C', '品牌D', '品牌E']
    const products: Product[] = []

    for (let i = 1; i <= 50; i++) {
        const categoryIndex = Math.floor(Math.random() * categories.length)
        const brandIndex = Math.floor(Math.random() * brands.length)
        const price = Math.floor(Math.random() * 900) + 100  // 100-999
        const rating = Math.floor(Math.random() * 5) + 1  // 1-5

        products.push(new Product(
            `p${i}`,
            `商品${i}`,
            categories[categoryIndex],
            brands[brandIndex],
            price,
            rating,
            'app.media.phone'  // 使用应用资源中的图片
        ))
    }

    return products
}
二、交互功能实现
2.1 筛选逻辑实现
筛选逻辑是电商应用的核心功能,我们需要根据用户选择的筛选条件过滤商品数据:
// 应用筛选条件
private applyFilters(): void {
    this.isLoading = true

    // 模拟网络延迟
    setTimeout(() => {
        this.filteredProducts = this.products.filter(product => {
            // 价格范围筛选
            if (product.price < this.currentFilter.priceRange[0] ||
                product.price > this.currentFilter.priceRange[1]) {
                return false
            }

            // 分类筛选
            if (this.currentFilter.categories.length > 0 &&
                !this.currentFilter.categories.includes(product.category)) {
                return false
            }

            // 品牌筛选
            if (this.currentFilter.brands.length > 0 &&
                !this.currentFilter.brands.includes(product.brand)) {
                return false
            }

            // 评分筛选
            if (product.rating < this.currentFilter.minRating) {
                return false
            }

            return true
        })

        // 排序
        this.sortProducts()

        this.isLoading = false
        this.isFilterChanged = false
    }, 500)  // 模拟500ms延迟
}

// 排序商品
private sortProducts(): void {
    switch (this.currentFilter.sortBy) {
        case 'priceAsc':
            this.filteredProducts.sort((a, b) => a.price - b.price)
            break
        case 'priceDesc':
            this.filteredProducts.sort((a, b) => b.price - a.price)
            break
        case 'newest':
            this.filteredProducts.sort((a, b) =>
                b.createdAt.getTime() - a.createdAt.getTime())
            break
        default:
            // 默认排序,不做处理
            break
    }
}
2.2 双向数据绑定
为了提升用户体验,我们可以使用双向数据绑定来实现筛选条件的实时预览:
// 价格范围滑块
Row() {
    Text(`¥${this.tempFilter.priceRange[0]}`).fontSize(14)
    Slider({
        min: 0,
        max: 1000,
        step: 50,
        value: this.tempFilter.priceRange[0],
        style: SliderStyle.OutSet
    })
        .width('70%')
        .blockColor('#ff4500')
        .onChange((value: number) => {
            // 确保最低价不高于最高价
            if (value <= this.tempFilter.priceRange[1]) {
                this.tempFilter.priceRange[0] = value
            } else {
                this.tempFilter.priceRange[0] = this.tempFilter.priceRange[1]
            }
            this.isFilterChanged = true
            this.updatePreviewCount()  // 更新预览数量
        })
    Text(`¥${this.tempFilter.priceRange[1]}`).fontSize(14)
}
.width('100%')
.justifyContent(FlexAlign.SpaceBetween)
.padding({ left: 10, right: 10 })
2.3 筛选条件预览
为了让用户了解筛选结果,我们可以实现筛选条件的预览功能:
// 预览筛选结果
private updatePreviewCount(): void {
    // 在实际应用中,这里可能需要发送网络请求获取预览数量
    // 这里我们使用模拟数据
    const previewCount = this.products.filter(product => {
        // 价格范围筛选
        if (product.price < this.tempFilter.priceRange[0] ||
            product.price > this.tempFilter.priceRange[1]) {
            return false
        }

        // 分类筛选
        if (this.tempFilter.categories.length > 0 &&
            !this.tempFilter.categories.includes(product.category)) {
            return false
        }

        // 品牌筛选
        if (this.tempFilter.brands.length > 0 &&
            !this.tempFilter.brands.includes(product.brand)) {
            return false
        }

        // 评分筛选
        if (product.rating < this.tempFilter.minRating) {
            return false
        }

        return true
    }).length

    this.previewCount = previewCount
}
2.4 筛选条件的保存和恢复
为了提升用户体验,我们可以保存用户的筛选条件,以便在下次打开应用时恢复:
// 保存筛选条件
private saveFilters(): void {
    // 将筛选条件转换为JSON字符串
    const filterJson = JSON.stringify(this.currentFilter)
    // 保存到持久化存储
    AppStorage.SetOrCreate<string>('shoppingFilters', filterJson)
}

// 恢复筛选条件
private restoreFilters(): void {
    // 从持久化存储获取筛选条件
    const filterJson = AppStorage.Get<string>('shoppingFilters')
    if (filterJson) {
        try {
            // 解析JSON字符串
            const savedFilter = JSON.parse(filterJson)
            // 创建新的FilterOptions对象
            this.currentFilter = new FilterOptions(savedFilter)
            // 创建临时筛选条件的副本
            this.tempFilter = this.currentFilter.clone()
            // 应用筛选条件
            this.applyFilters()
        } catch (error) {
            console.error('恢复筛选条件失败:', error)
            // 使用默认筛选条件
            this.resetFilters()
        }
    } else {
        // 没有保存的筛选条件,使用默认值
        this.resetFilters()
    }
}
三、高级交互特性
3.1 筛选条件的实时预览
为了提供更好的用户体验,我们可以实现筛选条件的实时预览功能,让用户在调整筛选条件时即时看到可能的结果数量:
// 侧边栏底部显示预览信息
Row() {
    Column() {
        Text(`预计找到 ${this.previewCount} 件商品`)
            .fontSize(14)
            .fontColor(this.previewCount > 0 ? '#333' : '#ff4500')

        if (this.previewCount === 0) {
            Text('没有符合条件的商品,请调整筛选条件')
                .fontSize(12)
                .fontColor('#ff4500')
        }
    }
    .alignItems(HorizontalAlign.Start)

    Row() {
        Button('重置', { type: ButtonType.Normal })
            .width(80)
            .height(36)
            .backgroundColor('#f5f5f5')
            .fontColor('#333')
            .margin({ right: 10 })
            .onClick(() => {
                this.resetFilters()
                this.updatePreviewCount()
            })

        Button('确定', { type: ButtonType.Capsule })
            .width(80)
            .height(36)
            .backgroundColor(this.previewCount > 0 ? '#ff4500' : '#ccc')
            .enabled(this.previewCount > 0)
            .onClick(() => {
                // 将临时筛选条件应用到当前筛选条件
                this.currentFilter = this.tempFilter.clone()
                this.applyFilters()
                this.saveFilters()
                this.isSideBarShow = false
            })
    }
}
.width('100%')
.justifyContent(FlexAlign.SpaceBetween)
.padding(10)
.backgroundColor('#f5f5f5')
.position({ bottom: 0 })
3.2 多级筛选
在复杂的电商应用中,我们可能需要实现多级筛选功能,例如按品牌、价格区间、评分等多个维度进行筛选:
// 多级筛选界面
Tabs() {
    TabContent() {
        // 价格筛选内容
        this.PriceFilterContent()
    }
    .tabBar('价格')

    TabContent() {
        // 分类筛选内容
        this.CategoryFilterContent()
    }
    .tabBar('分类')

    TabContent() {
        // 品牌筛选内容
        this.BrandFilterContent()
    }
    .tabBar('品牌')

    TabContent() {
        // 评分筛选内容
        this.RatingFilterContent()
    }
    .tabBar('评分')

    TabContent() {
        // 排序筛选内容
        this.SortFilterContent()
    }
    .tabBar('排序')
}
.barMode(BarMode.Fixed)
.barWidth('100%')
.barHeight(50)
.animationDuration(300)
.onChange((index: number) => {
    this.currentTabIndex = index
})
3.3 筛选条件的可视化展示
为了让用户清楚地了解当前应用的筛选条件,我们可以在主内容区显示已应用的筛选条件:
// 显示已应用的筛选条件
if (!this.currentFilter.isDefault()) {
    Row() {
        Text('已筛选:')
            .fontSize(14)
            .fontColor('#666')

        Scroll(ScrollDirection.Horizontal) {
            Row() {
                // 价格范围
                if (this.currentFilter.priceRange[0] > 0 ||
                    this.currentFilter.priceRange[1] < 1000) {
                    Chip({
                        content: `¥${this.currentFilter.priceRange[0]}-¥${this.currentFilter.priceRange[1]}`,
                        closable: true
                    })
                    .margin({ right: 5 })
                    .onClose(() => {
                        this.currentFilter.priceRange = [0, 1000]
                        this.tempFilter.priceRange = [0, 1000]
                        this.applyFilters()
                    })
                }

                // 分类
                ForEach(this.currentFilter.categories, (category: string) => {
                    Chip({
                        content: category,
                        closable: true
                    })
                    .margin({ right: 5 })
                    .onClose(() => {
                        this.currentFilter.categories =
                            this.currentFilter.categories.filter(c => c !== category)
                        this.tempFilter.categories = [...this.currentFilter.categories]
                        this.applyFilters()
                    })
                })

                // 品牌
                ForEach(this.currentFilter.brands, (brand: string) => {
                    Chip({
                        content: brand,
                        closable: true
                    })
                    .margin({ right: 5 })
                    .onClose(() => {
                        this.currentFilter.brands =
                            this.currentFilter.brands.filter(b => b !== brand)
                        this.tempFilter.brands = [...this.currentFilter.brands]
                        this.applyFilters()
                    })
                })

                // 评分
                if (this.currentFilter.minRating > 0) {
                    Chip({
                        content: `${this.currentFilter.minRating}星及以上`,
                        closable: true
                    })
                    .margin({ right: 5 })
                    .onClose(() => {
                        this.currentFilter.minRating = 0
                        this.tempFilter.minRating = 0
                        this.applyFilters()
                    })
                }

                // 排序
                if (this.currentFilter.sortBy !== 'default') {
                    const sortText = {
                        'priceAsc': '价格从低到高',
                        'priceDesc': '价格从高到低',
                        'newest': '最新上架'
                    }[this.currentFilter.sortBy]

                    Chip({
                        content: sortText,
                        closable: true
                    })
                    .margin({ right: 5 })
                    .onClose(() => {
                        this.currentFilter.sortBy = 'default'
                        this.tempFilter.sortBy = 'default'
                        this.applyFilters()
                    })
                }

                // 清除所有筛选条件
                Button('清除全部', { type: ButtonType.Capsule })
                    .height(28)
                    .fontSize(12)
                    .backgroundColor('#f5f5f5')
                    .fontColor('#666')
                    .onClick(() => {
                        this.resetFilters()
                    })
            }
            .width('100%')
            .padding({ right: 10 })
        }
        .scrollBar(BarState.Off)
        .width('85%')
    }
    .width('100%')
    .padding({ left: 10, top: 5, bottom: 5 })
    .backgroundColor('#f5f5f5')
}
3.4 加载状态和空状态处理
在实际应用中,我们需要处理数据加载状态和空状态,提供良好的用户体验:
// 商品列表区域
Column() {
    // 加载状态
    if (this.isLoading) {
        LoadingProgress()
            .width(50)
            .height(50)
            .color('#ff4500')
        Text('正在加载商品...')
            .fontSize(14)
            .fontColor('#666')
            .margin({ top: 10 })
    }
    // 空状态
    else if (this.filteredProducts.length === 0) {
        Image($r('app.media.empty'))
            .width(100)
            .height(100)
            .objectFit(ImageFit.Contain)
        Text('没有找到符合条件的商品')
            .fontSize(16)
            .fontColor('#666')
            .margin({ top: 10 })
        Button('清除筛选条件', { type: ButtonType.Capsule })
            .margin({ top: 20 })
            .onClick(() => {
                this.resetFilters()
            })
    }
    // 商品列表
    else {
        Grid() {
            ForEach(this.filteredProducts, (product: Product) => {
                GridItem() {
                    this.ProductItem(product)
                }
            })
        }
        .columnsTemplate('1fr 1fr')
        .columnsGap(10)
        .rowsGap(10)
        .width('100%')
        .padding(10)
    }
}
.width('100%')
.height('100%')
.justifyContent(FlexAlign.Center)
四、生命周期管理
4.1 组件生命周期
在实际应用中,我们需要在组件的生命周期中初始化数据和释放资源:
aboutToAppear() {
    // 生成模拟商品数据
    this.products = this.generateMockProducts()
    // 初始化筛选条件
    this.currentFilter = new FilterOptions()
    this.tempFilter = this.currentFilter.clone()
    // 恢复保存的筛选条件
    this.restoreFilters()
    // 应用筛选条件
    this.filteredProducts = [...this.products]
    this.applyFilters()
}

aboutToDisappear() {
    // 保存筛选条件
    this.saveFilters()
}
4.2 状态持久化
为了提升用户体验,我们可以使用AppStorage或LocalStorage来持久化用户的筛选条件:
// 使用AppStorage持久化筛选条件
private saveFilters(): void {
    AppStorage.SetOrCreate<string>('shoppingFilters', JSON.stringify(this.currentFilter))
}

private restoreFilters(): void {
    const filterJson = AppStorage.Get<string>('shoppingFilters')
    if (filterJson) {
        try {
            const savedFilter = JSON.parse(filterJson)
            this.currentFilter = new FilterOptions(savedFilter)
            this.tempFilter = this.currentFilter.clone()
        } catch (error) {
            console.error('恢复筛选条件失败:', error)
            this.resetFilters()
        }
    }
}
五、实战案例:添加商品收藏功能
为了进一步提升用户体验,我们可以添加商品收藏功能,让用户可以收藏感兴趣的商品:
5.1 数据模型扩展
首先,我们需要扩展商品数据模型,添加收藏状态:
class Product {
    id: string
    name: string
    category: string
    brand: string
    price: number
    rating: number
    imageUrl: string
    createdAt: Date
    isFavorite: boolean = false  // 收藏状态

    // 构造函数...
}
5.2 收藏功能实现
然后,我们实现收藏和取消收藏的功能:
// 切换商品收藏状态
private toggleFavorite(productId: string): void {
    // 更新商品列表中的收藏状态
    this.products = this.products.map(product => {
        if (product.id === productId) {
            return { ...product, isFavorite: !product.isFavorite }
        }
        return product
    })

    // 更新筛选后的商品列表
    this.filteredProducts = this.filteredProducts.map(product => {
        if (product.id === productId) {
            return { ...product, isFavorite: !product.isFavorite }
        }
        return product
    })

    // 保存收藏状态
    this.saveFavorites()
}

// 保存收藏状态
private saveFavorites(): void {
    const favoriteIds = this.products
        .filter(product => product.isFavorite)
        .map(product => product.id)

    AppStorage.SetOrCreate<string>('favoriteProducts', JSON.stringify(favoriteIds))
}

// 恢复收藏状态
private restoreFavorites(): void {
    const favoriteJson = AppStorage.Get<string>('favoriteProducts')
    if (favoriteJson) {
        try {
            const favoriteIds: string[] = JSON.parse(favoriteJson)

            // 更新商品列表中的收藏状态
            this.products = this.products.map(product => ({
                ...product,
                isFavorite: favoriteIds.includes(product.id)
            }))

            // 更新筛选后的商品列表
            this.filteredProducts = this.filteredProducts.map(product => ({
                ...product,
                isFavorite: favoriteIds.includes(product.id)
            }))
        } catch (error) {
            console.error('恢复收藏状态失败:', error)
        }
    }
}
5.3 收藏按钮UI实现
最后,我们在商品项中添加收藏按钮:
// 商品项组件
@Builder
private ProductItem(product: Product) {
    Column() {
        Stack() {
            Image($r(`app.media.${product.imageUrl}`))
                .width(120)
                .height(120)
                .objectFit(ImageFit.Contain)

            // 收藏按钮
            Button({ type: ButtonType.Circle, stateEffect: true })
                .width(36)
                .height(36)
                .position({ top: 5, right: 5 })
                .backgroundColor('rgba(255, 255, 255, 0.8)')
                .onClick(() => {
                    this.toggleFavorite(product.id)
                })

            // 收藏图标
            if (product.isFavorite) {
                Image($r('app.media.favorite_filled'))
                    .width(24)
                    .height(24)
                    .position({ top: 11, right: 11 })
                    .fillColor('#ff4500')
            } else {
                Image($r('app.media.favorite_outline'))
                    .width(24)
                    .height(24)
                    .position({ top: 11, right: 11 })
                    .fillColor('#666')
            }
        }
        .width('100%')
        .height(120)

        Text(product.name)
            .fontSize(14)
            .margin({ top: 5 })
            .maxLines(2)
            .textOverflow({ overflow: TextOverflow.Ellipsis })

        Row() {
            Text(`¥${product.price}`)
                .fontSize(16)
                .fontColor('#ff4500')
                .fontWeight(FontWeight.Bold)

            // 评分
            Row() {
                ForEach(Array.from({ length: 5 }, (_, i) => i < product.rating), (filled: boolean) => {
                    Image($r(filled ? 'app.media.star_filled' : 'app.media.star_outline'))
                        .width(12)
                        .height(12)
                        .fillColor(filled ? '#ffb700' : '#ccc')
                })
            }
            .margin({ left: 5 })
        }
        .width('100%')
        .justifyContent(FlexAlign.SpaceBetween)
        .margin({ top: 5 })
    }
    .width('100%')
    .padding(10)
    .borderRadius(8)
    .backgroundColor(Color.White)
    .shadow({ radius: 2, color: '#999', offsetX: 1, offsetY: 1 })
}
5.4 收藏筛选功能
我们还可以添加一个「只看收藏」的筛选选项:
// 筛选条件模型扩展
class FilterOptions {
    // 其他属性...
    showFavoritesOnly: boolean = false

    // 构造函数和方法...
}

// 筛选逻辑扩展
private applyFilters(): void {
    this.isLoading = true

    setTimeout(() => {
        this.filteredProducts = this.products.filter(product => {
            // 只看收藏
            if (this.currentFilter.showFavoritesOnly && !product.isFavorite) {
                return false
            }

            // 其他筛选条件...

            return true
        })

        // 排序
        this.sortProducts()

        this.isLoading = false
        this.isFilterChanged = false
    }, 500)
}

// 收藏筛选UI
Row() {
    Checkbox()
        .select(this.tempFilter.showFavoritesOnly)
        .onChange((isChecked: boolean) => {
            this.tempFilter.showFavoritesOnly = isChecked
            this.isFilterChanged = true
            this.updatePreviewCount()
        })
    Text('只看收藏')
        .fontSize(14)
        .margin({ left: 5 })
}
.margin({ top: 10, left: 10 })
六、总结
本教程详细介绍了如何为电商应用的商品筛选侧边栏实现交互功能和状态管理 ,通过这些功能的实现,我们可以为用户提供一个功能丰富、交互流畅的电商应用筛选体验。在实际开发中,还可以根据具体需求进一步扩展和优化这些功能,例如添加更多筛选条件、实现更复杂的排序逻辑、优化性能等。 在下一篇教程中,我们将探讨如何为电商应用添加更高级的功能,如商品详情页、购物车、用户评价等,敬请期待!
