164.[HarmonyOS NEXT 实战案例三:Grid] 不规则网格布局进阶篇:新闻应用高级布局与交互
[HarmonyOS NEXT 实战案例三:Grid] 不规则网格布局进阶篇:新闻应用高级布局与交互
项目已开源,开源地址: https://gitcode.com/nutpi/HarmonyosNextCaseStudyTutorial , 欢迎fork & star
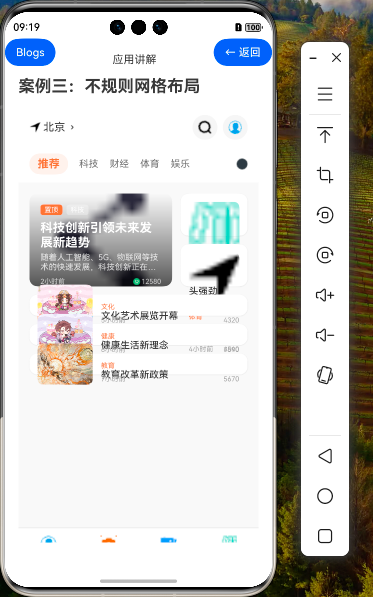
效果演示


1. 不规则网格布局进阶概念
在基础篇中,我们学习了如何使用Grid和GridItem组件创建基本的不规则网格布局。在本篇教程中,我们将深入探讨Grid组件的高级特性、复杂布局技巧和交互设计,以及如何在新闻应用中实现更丰富的功能。
1.1 Grid组件的高级属性
| 属性 | 说明 | 用途 |
|---|---|---|
| layoutDirection | 布局方向 | 控制网格项的排列方向,可选值为Row(水平)和Column(垂直) |
| layoutWeight | 布局权重 | 控制Grid在父容器中的弹性伸缩比例 |
| maxCount | 最大子组件数量 | 限制Grid中可以放置的最大子组件数量 |
| minCount | 最小子组件数量 | 设置Grid中至少需要放置的子组件数量 |
| cellLength | 网格单元格长度 | 设置网格单元格的固定长度 |
| multiSelectable | 是否可多选 | 设置是否可以多选网格项 |
| supportAnimation | 是否支持动画 | 设置是否支持动画效果 |
1.2 GridItem的高级定位与跨度
在不规则网格布局中,GridItem的定位和跨度设置是关键。除了基础篇中介绍的rowStart、rowEnd、columnStart、columnEnd属性外,我们还可以使用以下技巧:
- 自动定位:如果不指定位置属性,GridItem会自动放置在网格中的下一个可用位置
- 跨度简写:可以只设置起始位置,不设置结束位置,此时默认跨度为1
- 负值索引:可以使用负值索引,表示从末尾开始计数
- 跨度优先级:当多个GridItem竞争同一位置时,会按照添加顺序优先放置
2. 新闻应用高级布局实现
2.1 动态行列模板
在基础篇中,我们使用固定的行列模板。现在,我们将学习如何根据内容动态调整行列模板:
@State screenWidth: number = 0;
@State columnCount: number = 3;

onPageShow() {
  // 获取屏幕宽度
  this.screenWidth = px2vp(window.getWindowWidth());
  // 根据屏幕宽度动态设置列数
  if (this.screenWidth < 600) {
    this.columnCount = 2;
  } else if (this.screenWidth < 840) {
    this.columnCount = 3;
  } else {
    this.columnCount = 4;
  }
}

build() {
  // 动态生成列模板
  let columnsTemplate = '';
  for (let i = 0; i < this.columnCount; i++) {
    columnsTemplate += '1fr ';
  }

  // 使用动态列模板
  Grid() {
    // 网格项内容...
  }
  .columnsTemplate(columnsTemplate.trim())
  // 其他属性...
}
这段代码展示了如何根据屏幕宽度动态调整Grid的列数,实现响应式布局。
2.2 复杂布局模式
在新闻应用中,我们可以实现更复杂的布局模式,例如"T字形"布局:
// T字形布局
Grid() {
  // 顶部横条(占据所有列)
  GridItem() {
    // 头条新闻内容...
  }
  .rowStart(0)
  .columnStart(0)
  .columnEnd(this.columnCount - 1)

  // 中间主体(占据中间列)
  GridItem() {
    // 主要新闻内容...
  }
  .rowStart(1)
  .rowEnd(3)
  .columnStart(Math.floor(this.columnCount / 2) - 1)
  .columnEnd(Math.floor(this.columnCount / 2))

  // 左侧小新闻
  ForEach(this.leftNews, (news, index) => {
    GridItem() {
      // 小新闻内容...
    }
    .rowStart(1 + index)
    .columnStart(0)
    .columnEnd(Math.floor(this.columnCount / 2) - 2)
  })

  // 右侧小新闻
  ForEach(this.rightNews, (news, index) => {
    GridItem() {
      // 小新闻内容...
    }
    .rowStart(1 + index)
    .columnStart(Math.floor(this.columnCount / 2) + 1)
    .columnEnd(this.columnCount - 1)
  })
}
.columnsTemplate(columnsTemplate.trim())
.rowsTemplate('200px 150px 150px 150px')
// 其他属性...
这种T字形布局可以突出显示头条新闻和主要内容,同时在两侧展示次要新闻。
2.3 网格区域命名
为了更好地管理复杂布局,我们可以使用网格区域命名技术:
// 定义网格区域名称
@State gridAreas: string[] = [
  'header header header',
  'left main right',
  'left main right',
  'footer footer footer'
];

build() {
  Grid() {
    // 头部区域
    GridItem() {
      // 头条新闻内容...
    }
    .gridArea('header')

    // 主要内容区域
    GridItem() {
      // 主要新闻内容...
    }
    .gridArea('main')

    // 左侧区域
    GridItem() {
      // 左侧新闻内容...
    }
    .gridArea('left')

    // 右侧区域
    GridItem() {
      // 右侧新闻内容...
    }
    .gridArea('right')

    // 底部区域
    GridItem() {
      // 底部新闻内容...
    }
    .gridArea('footer')
  }
  .columnsTemplate('1fr 2fr 1fr')
  .rowsTemplate('200px 150px 150px 100px')
  .areas(this.gridAreas)
  // 其他属性...
}
通过网格区域命名,我们可以更直观地定义和管理复杂布局,而不必关心具体的行列索引。
3. 高级交互设计
3.1 新闻卡片交互效果
在新闻应用中,卡片交互是提升用户体验的关键。以下是一些高级交互效果的实现:
// 新闻卡片交互效果
GridItem() {
  Stack({ alignContent: Alignment.BottomStart }) {
    // 图片和基本内容...

    // 点击效果层
    Column()
      .width('100%')
      .height('100%')
      .borderRadius(12)
      .backgroundColor('rgba(0, 0, 0, 0.0)')
      .stateStyles({
        pressed: {
          .backgroundColor('rgba(0, 0, 0, 0.1)')
        },
        normal: {
          .backgroundColor('rgba(0, 0, 0, 0.0)')
        }
      })
  }
  .width('100%')
  .height('100%')
  .gesture(
    LongPressGesture()
      .onAction(() => {
        this.showActionMenu(this.newsData[0]);
      })
  )
  .onClick(() => {
    console.log(`点击头条新闻: ${this.newsData[0].title}`);
    // 导航到新闻详情页
  })
}
.rowStart(0)
.rowEnd(1)
.columnStart(0)
.columnEnd(1)
这段代码实现了新闻卡片的点击效果和长按菜单功能,增强了用户交互体验。
3.2 滑动手势与动画
我们可以为新闻卡片添加滑动手势和动画效果:
@State swipeThreshold: number = 50;
@State currentIndex: number = 0;

// 滑动手势与动画
GridItem() {
  Column() {
    // 新闻卡片内容...
  }
  .width('100%')
  .height('100%')
  .translate({ x: this.translateX })
  .animation({
    duration: 300,
    curve: Curve.Ease
  })
  .gesture(
    PanGesture()
      .onActionStart(() => {
        this.startX = 0;
      })
      .onActionUpdate((event) => {
        this.translateX = event.offsetX;
      })
      .onActionEnd(() => {
        if (Math.abs(this.translateX) > this.swipeThreshold) {
          if (this.translateX > 0 && this.currentIndex > 0) {
            // 向右滑动,显示上一条
            this.currentIndex--;
          } else if (this.translateX < 0 && this.currentIndex < this.newsData.length - 1) {
            // 向左滑动,显示下一条
            this.currentIndex++;
          }
        }
        this.translateX = 0;
      })
  )
}
.rowStart(0)
.columnStart(0)
这段代码实现了新闻卡片的滑动切换效果,用户可以通过左右滑动浏览不同的新闻。
3.3 下拉刷新与加载更多
在新闻应用中,下拉刷新和加载更多是常见的交互模式:
@State refreshing: boolean = false;
@State loading: boolean = false;

build() {
  Refresh({ refreshing: this.refreshing }) {
    Grid() {
      // 网格内容...

      // 加载更多
      GridItem() {
        if (this.loading) {
          LoadingProgress()
            .width(24)
            .height(24)
            .color('#FF6B35')
        } else {
          Text('加载更多')
            .fontSize(14)
            .fontColor('#999999')
            .onClick(() => {
              this.loadMoreNews();
            })
        }
      }
      .columnStart(0)
      .columnEnd(this.columnCount - 1)
    }
    .columnsTemplate(columnsTemplate.trim())
    // 其他属性...
  }
  .onRefresh(() => {
    this.refreshNews();
  })
}

async refreshNews() {
  this.refreshing = true;
  // 模拟网络请求
  await new Promise(resolve => setTimeout(resolve, 1500));
  // 更新新闻数据
  this.newsData = [...]; // 新数据
  this.refreshing = false;
}

async loadMoreNews() {
  this.loading = true;
  // 模拟网络请求
  await new Promise(resolve => setTimeout(resolve, 1500));
  // 追加新闻数据
  this.newsData = [...this.newsData, ...]; // 追加数据
  this.loading = false;
}
这段代码实现了下拉刷新和点击加载更多功能,提升了新闻应用的用户体验。
4. 高级样式与视觉效果
4.1 卡片阴影与层次
为了增强视觉层次感,我们可以为不同类型的新闻卡片设置不同的阴影效果:
// 头条新闻卡片
GridItem() {
  // 内容...
}
.rowStart(0)
.rowEnd(1)
.columnStart(0)
.columnEnd(1)
.shadow({
  radius: 16,
  color: 'rgba(0, 0, 0, 0.2)',
  offsetX: 0,
  offsetY: 4
})

// 普通新闻卡片
GridItem() {
  // 内容...
}
.rowStart(0)
.columnStart(2)
.shadow({
  radius: 8,
  color: 'rgba(0, 0, 0, 0.1)',
  offsetX: 0,
  offsetY: 2
})
通过设置不同的阴影参数,我们可以为不同重要程度的新闻卡片创建不同的视觉层次。
4.2 渐变与蒙版效果
在新闻卡片中,渐变和蒙版效果可以提升文字的可读性和视觉美感:
// 多层渐变蒙版
Stack({ alignContent: Alignment.BottomStart }) {
  Image(news.image)
    .width('100%')
    .height('100%')
    .objectFit(ImageFit.Cover)
    .borderRadius(12)

  // 底部渐变蒙版
  Column()
    .width('100%')
    .height('60%')
    .borderRadius({ bottomLeft: 12, bottomRight: 12 })
    .linearGradient({
      direction: GradientDirection.Bottom,
      colors: [
        ['rgba(0, 0, 0, 0)', 0.0],
        ['rgba(0, 0, 0, 0.5)', 0.5],
        ['rgba(0, 0, 0, 0.8)', 1.0]
      ]
    })

  // 顶部渐变蒙版(用于标题栏)
  Column()
    .width('100%')
    .height('30%')
    .borderRadius({ topLeft: 12, topRight: 12 })
    .linearGradient({
      direction: GradientDirection.Top,
      colors: [
        ['rgba(0, 0, 0, 0)', 0.0],
        ['rgba(0, 0, 0, 0.4)', 1.0]
      ]
    })

  // 新闻内容...
}
这段代码实现了顶部和底部双向渐变蒙版效果,使得标题栏和内容区域的文字在图片背景上更加清晰可读。
4.3 动态主题与暗黑模式
我们可以为新闻应用实现动态主题和暗黑模式支持:
@StorageLink('themeMode') themeMode: string = 'light';

@Builder
NewsCard(news: NewsData) {
  Column() {
    // 新闻卡片内容...
  }
  .width('100%')
  .padding(12)
  .backgroundColor(this.themeMode === 'light' ? '#FFFFFF' : '#333333')
  .borderRadius(12)
}

build() {
  Grid() {
    // 使用主题适配的新闻卡片
    GridItem() {
      this.NewsCard(this.newsData[0])
    }
    .rowStart(0)
    .rowEnd(1)
    .columnStart(0)
    .columnEnd(1)

    // 其他网格项...
  }
  .backgroundColor(this.themeMode === 'light' ? '#F8F8F8' : '#222222')
  // 其他属性...
}
通过响应主题模式变化,我们可以为用户提供适合不同环境的视觉体验。
5. 组件化与代码复用
5.1 自定义新闻卡片组件
为了提高代码复用性和可维护性,我们可以将新闻卡片封装为自定义组件:
@Component
struct NewsCard {
  @Prop news: NewsData;
  @Prop cardType: string = 'normal'; // 'headline', 'normal', 'small'
  @Consume themeMode: string;

  build() {
    if (this.cardType === 'headline') {
      this.HeadlineCard();
    } else if (this.cardType === 'normal') {
      this.NormalCard();
    } else {
      this.SmallCard();
    }
  }

  @Builder
  HeadlineCard() {
    // 头条新闻卡片实现...
  }

  @Builder
  NormalCard() {
    // 普通新闻卡片实现...
  }

  @Builder
  SmallCard() {
    // 小型新闻卡片实现...
  }
}
然后在Grid中使用这个自定义组件:
Grid() {
  // 头条新闻
  GridItem() {
    NewsCard({ news: this.newsData[0], cardType: 'headline' })
  }
  .rowStart(0)
  .rowEnd(1)
  .columnStart(0)
  .columnEnd(1)

  // 普通新闻
  GridItem() {
    NewsCard({ news: this.newsData[1], cardType: 'normal' })
  }
  .rowStart(0)
  .columnStart(2)

  // 小型新闻列表
  ForEach(this.newsData.slice(3), (news, index) => {
    GridItem() {
      NewsCard({ news: news, cardType: 'small' })
    }
    .columnStart(0)
    .columnEnd(2)
  })
}
通过组件化,我们可以更好地管理不同类型的新闻卡片,提高代码的可维护性和可扩展性。
5.2 布局模板复用
对于复杂的网格布局,我们可以定义布局模板并复用:
@Component
struct GridLayout {
  @Prop layoutType: string = 'default'; // 'default', 'featured', 'compact'
  @BuilderParam content: () => void;
  @State columnsTemplate: string = '';
  @State rowsTemplate: string = '';

  aboutToAppear() {
    this.updateLayout();
  }

  updateLayout() {
    if (this.layoutType === 'default') {
      this.columnsTemplate = '1fr 1fr 1fr';
      this.rowsTemplate = '200px 200px 100px 100px 100px';
    } else if (this.layoutType === 'featured') {
      this.columnsTemplate = '2fr 1fr 1fr';
      this.rowsTemplate = '300px 150px 150px 100px';
    } else {
      this.columnsTemplate = '1fr 1fr';
      this.rowsTemplate = '150px 150px 150px';
    }
  }

  build() {
    Grid() {
      this.content();
    }
    .columnsTemplate(this.columnsTemplate)
    .rowsTemplate(this.rowsTemplate)
    .rowsGap(12)
    .columnsGap(12)
    .width('100%')
    .layoutWeight(1)
  }
}
然后在页面中使用这个布局模板:
GridLayout({ layoutType: 'featured' }) {
  // 头条新闻
  GridItem() {
    NewsCard({ news: this.newsData[0], cardType: 'headline' })
  }
  .rowStart(0)
  .rowEnd(1)
  .columnStart(0)

  // 其他网格项...
}
通过布局模板复用,我们可以轻松切换不同的布局风格,提高开发效率。
6. 高级状态管理
6.1 新闻数据分类与过滤
在新闻应用中,我们需要对新闻数据进行分类和过滤:
@State newsData: NewsData[] = [];
@State categories: string[] = ['推荐', '科技', '财经', '体育', '娱乐'];
@State currentCategory: string = '推荐';

getNewsByCategory(category: string): NewsData[] {
  if (category === '推荐') {
    return this.newsData;
  } else {
    return this.newsData.filter(news => news.category === category);
  }
}

build() {
  Column() {
    // 分类标签栏
    Row() {
      ForEach(this.categories, (category: string) => {
        Text(category)
          .fontSize(category === this.currentCategory ? 16 : 14)
          .fontWeight(category === this.currentCategory ? FontWeight.Bold : FontWeight.Normal)
          .fontColor(category === this.currentCategory ? '#FF6B35' : '#666666')
          .padding({ left: 12, right: 12, top: 6, bottom: 6 })
          .borderRadius(16)
          .backgroundColor(category === this.currentCategory ? 'rgba(255, 107, 53, 0.1)' : 'transparent')
          .margin({ right: 16 })
          .onClick(() => {
            this.currentCategory = category;
          })
      })
    }
    .width('100%')
    .padding({ left: 16, right: 16, top: 12, bottom: 12 })
    .backgroundColor('#FFFFFF')

    // 新闻网格布局
    Grid() {
      // 根据当前分类显示新闻
      this.renderNewsByCategory(this.currentCategory);
    }
    // 其他属性...
  }
}

@Builder
renderNewsByCategory(category: string) {
  let filteredNews = this.getNewsByCategory(category);

  if (filteredNews.length > 0) {
    // 头条新闻
    GridItem() {
      NewsCard({ news: filteredNews[0], cardType: 'headline' })
    }
    .rowStart(0)
    .rowEnd(1)
    .columnStart(0)
    .columnEnd(1)

    // 其他新闻...
  } else {
    // 空状态
    GridItem() {
      Column() {
        Image($r('app.media.empty_icon'))
          .width(64)
          .height(64)
          .opacity(0.5)

        Text('暂无相关新闻')
          .fontSize(16)
          .fontColor('#999999')
          .margin({ top: 16 })
      }
      .width('100%')
      .height('100%')
      .justifyContent(FlexAlign.Center)
    }
    .rowStart(0)
    .columnStart(0)
    .columnEnd(2)
  }
}
这段代码实现了新闻分类和过滤功能,用户可以通过点击分类标签切换不同类别的新闻。
6.2 新闻收藏与阅读历史
我们可以实现新闻收藏和阅读历史功能:
@StorageLink('favoriteNews') favoriteNews: number[] = [];
@StorageLink('readHistory') readHistory: number[] = [];

isNewsFavorite(newsId: number): boolean {
  return this.favoriteNews.includes(newsId);
}

toggleFavorite(newsId: number) {
  if (this.isNewsFavorite(newsId)) {
    this.favoriteNews = this.favoriteNews.filter(id => id !== newsId);
  } else {
    this.favoriteNews = [...this.favoriteNews, newsId];
  }
}

markAsRead(newsId: number) {
  if (!this.readHistory.includes(newsId)) {
    this.readHistory = [...this.readHistory, newsId];
  }
}

// 在新闻卡片中使用
@Builder
NewsCard(news: NewsData) {
  Column() {
    // 新闻内容...

    Row() {
      // 时间和阅读数...

      Image(this.isNewsFavorite(news.id) ? $r('app.media.favorite_filled') : $r('app.media.favorite_outline'))
        .width(16)
        .height(16)
        .fillColor(this.isNewsFavorite(news.id) ? '#FF6B35' : '#999999')
        .onClick(() => {
          this.toggleFavorite(news.id);
        })
    }
    .width('100%')
  }
  .width('100%')
  .opacity(this.readHistory.includes(news.id) ? 0.7 : 1.0)
  .onClick(() => {
    this.markAsRead(news.id);
    // 导航到新闻详情页
  })
}
这段代码实现了新闻收藏和阅读历史功能,已读新闻会显示为半透明状态,用户可以收藏或取消收藏新闻。
7. 总结
在本教程中,我们深入探讨了HarmonyOS NEXT中Grid组件的高级特性和应用技巧,通过这些进阶技巧,我们可以创建更加丰富、交互更加流畅的不规则网格布局,为用户提供更好的新闻阅读体验。
- 0回答
- 5粉丝
- 0关注
