173.[HarmonyOS NEXT 实战案例六:Grid] 响应式网格布局 - 进阶篇
[HarmonyOS NEXT 实战案例六:Grid] 响应式网格布局 - 进阶篇
项目已开源,开源地址: https://gitcode.com/nutpi/HarmonyosNextCaseStudyTutorial , 欢迎fork & star
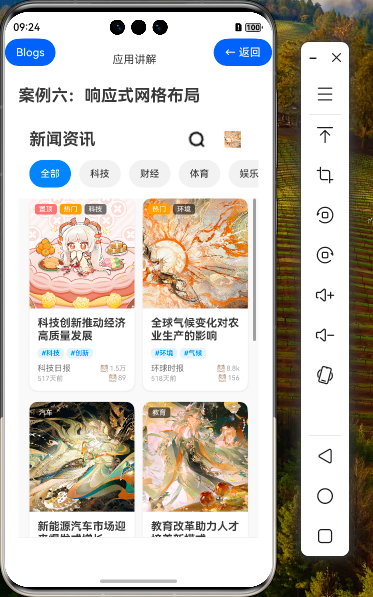
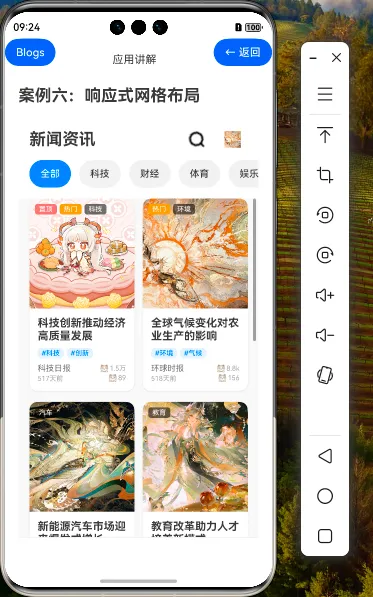
效果演示


在基础篇中,我们介绍了HarmonyOS NEXT响应式网格布局的基本概念和实现方法。本篇将深入探讨响应式网格布局的进阶技巧,包括高级断点策略、动态布局调整、交互优化以及性能提升方法,帮助开发者构建更加灵活、高效的响应式界面。
1. 高级断点策略
1.1 自定义断点系统
除了使用HarmonyOS默认的断点系统外,我们还可以根据应用的特定需求自定义断点:
// 自定义断点系统示例
const customBreakpoints = {
  small: '0vp',    // 小屏设备
  medium: '600vp', // 中等屏幕设备
  large: '960vp'   // 大屏设备
}
1.2 断点变化事件处理
在GridRow组件中,可以使用onBreakpointChange事件来监听断点变化,并执行相应的操作:
GridRow({
  columns: 12,
  breakpoints: {
    value: ['320vp', '600vp', '840vp'],
    reference: BreakpointsReference.WindowSize
  }
}) {
  // 网格内容
}
.onBreakpointChange((breakpoint: string) => {
  console.log(`当前断点: ${breakpoint}`)
  // 根据断点执行特定操作
  if (breakpoint === 'sm') {
    // 小屏幕设备的特定处理
  } else if (breakpoint === 'md') {
    // 中等屏幕设备的特定处理
  } else if (breakpoint === 'lg') {
    // 大屏设备的特定处理
  }
})
1.3 断点与设备方向结合
结合设备方向和断点,可以实现更精细的布局控制:
// 监听设备方向变化
@StorageProp('isLandscape') isLandscape: boolean = false

// 根据断点和设备方向返回列模板
getColumnsTemplate(): string {
  if (this.currentBreakpoint === 'sm') {
    return this.isLandscape ? '1fr 1fr' : '1fr'
  } else if (this.currentBreakpoint === 'md') {
    return this.isLandscape ? '1fr 1fr 1fr' : '1fr 1fr'
  } else {
    return this.isLandscape ? '1fr 1fr 1fr 1fr' : '1fr 1fr 1fr'
  }
}
2. 高级布局技巧
2.1 动态调整网格项高度
在ResponsiveGrid.ets中,我们根据断点动态调整网格项的高度:
.height(this.currentBreakpoint === 'sm' ? 320 : this.currentBreakpoint === 'md' ? 280 : 240)
这种方法可以进一步优化,使用函数来计算最佳高度:
getItemHeight(breakpoint: string): number {
  switch (breakpoint) {
    case 'sm':
      return 320 // 小屏设备高度
    case 'md':
      return 280 // 中等屏幕设备高度
    case 'lg':
      return 240 // 大屏设备高度
    default:
      return 280 // 默认高度
  }
}
2.2 内容优先级策略
根据屏幕尺寸调整内容显示的优先级,确保在小屏幕上显示最重要的信息:
// 在小屏幕上只显示摘要
if (this.currentBreakpoint === 'sm') {
  Text(item.summary)
    .fontSize(14)
    .fontColor('#666666')
    .maxLines(3)
    .textOverflow({ overflow: TextOverflow.Ellipsis })
    .width('100%')
    .textAlign(TextAlign.Start)
    .margin({ top: 8 })
}

// 在中等屏幕上显示标签
if (item.tags.length > 0 && this.currentBreakpoint !== 'lg') {
  Row() {
    ForEach(item.tags.slice(0, 2), (tag:string, index) => {
      Text(`#${tag}`)
        .fontSize(10)
        .fontColor('#007AFF')
        .backgroundColor('rgba(0, 122, 255, 0.1)')
        .padding({ left: 6, right: 6, top: 2, bottom: 2 })
        .borderRadius(6)
        .margin({ right: index < Math.min(item.tags.length, 2) - 1 ? 4 : 0 })
    })
  }
  .width('100%')
  .margin({ top: 8 })
}
2.3 高级网格模板
除了简单的等分列模板外,还可以使用更复杂的模板来创建多样化的布局:
// 混合固定宽度和弹性宽度的列模板
getAdvancedColumnsTemplate(): string {
  if (this.currentBreakpoint === 'sm') {
    return '1fr' // 小屏单列
  } else if (this.currentBreakpoint === 'md') {
    return '320px 1fr' // 中等屏幕:左侧固定宽度,右侧弹性宽度
  } else {
    return '320px 1fr 320px' // 大屏:两侧固定宽度,中间弹性宽度
  }
}
2.4 网格区域定义
使用Grid的areas属性和GridItem的area属性,可以创建更复杂的布局:
// 定义网格区域
Grid() {
  // 头部区域
  GridItem() {
    Text('头部内容')
  }.area('header')

  // 侧边栏区域
  GridItem() {
    Text('侧边栏内容')
  }.area('sidebar')

  // 主内容区域
  GridItem() {
    Text('主要内容')
  }.area('main')

  // 底部区域
  GridItem() {
    Text('底部内容')
  }.area('footer')
}
.columnsTemplate('1fr 3fr')
.rowsTemplate('auto 1fr auto')
.areas({
  sm: [
    ['header'], // 第一行
    ['main'],   // 第二行
    ['footer']  // 第三行
  ],
  md: [
    ['header', 'header'], // 第一行,跨两列
    ['sidebar', 'main'],  // 第二行,两列
    ['footer', 'footer']  // 第三行,跨两列
  ]
})
3. 高级交互与动画
3.1 网格项交互效果
为网格项添加点击、长按等交互效果,提升用户体验:
GridItem() {
  // 网格项内容
}
.onClick(() => {
  console.log(`查看新闻详情: ${item.title}`)
})
.gesture(
  LongPressGesture()
    .onAction(() => {
      // 长按操作,如显示更多选项
      console.log(`长按新闻项: ${item.title}`)
    })
)
.stateStyles({
  pressed: {
    scale: 0.95,
    opacity: 0.8
  }
})
3.2 网格布局动画
使用动画使网格布局的变化更加平滑:
// 定义动画控制器
@State animationController: AnimationController = new AnimationController()

// 在断点变化时应用动画
onBreakpointChange(breakpoint: string) {
  this.animationController.create()
    .duration(300) // 动画持续时间
    .curve(Curve.EaseInOut) // 动画曲线
    .onFinish(() => {
      // 动画完成后的操作
    })
    .play() // 播放动画
}
3.3 滚动优化
优化网格滚动体验,添加滚动指示器和回到顶部功能:
// 滚动控制器
@State scrollController: ScrollController = new ScrollController()

// 是否显示回到顶部按钮
@State showBackToTop: boolean = false

// 在网格容器外添加滚动控制
Column() {
  // 网格内容
  Grid() {
    // 网格项
  }
  .columnsTemplate(this.getColumnsTemplate())
  .rowsGap(16)
  .columnsGap(12)

  // 回到顶部按钮
  if (this.showBackToTop) {
    Button() {
      Image($r('app.media.arrow_up'))
        .width(24)
        .height(24)
    }
    .width(48)
    .height(48)
    .circle(true)
    .backgroundColor('#007AFF')
    .position({ x: '80%', y: '80%' })
    .onClick(() => {
      this.scrollController.scrollTo({ xOffset: 0, yOffset: 0, animation: true })
    })
  }
}
.width('100%')
.height('100%')
.onScroll((offset: number) => {
  // 滚动超过一定距离显示回到顶部按钮
  this.showBackToTop = offset > 300
})
.scrollController(this.scrollController)
4. 数据处理与性能优化
4.1 数据懒加载
实现数据懒加载,提高大量数据时的性能:
// 当前加载的数据
@State loadedItems: NewsItem[] = []

// 是否正在加载更多
@State isLoadingMore: boolean = false

// 是否还有更多数据
@State hasMoreData: boolean = true

// 加载更多数据
loadMoreData() {
  if (this.isLoadingMore || !this.hasMoreData) {
    return
  }

  this.isLoadingMore = true

  // 模拟网络请求
  setTimeout(() => {
    const startIndex = this.loadedItems.length
    const newItems = this.newsItems.slice(startIndex, startIndex + 10)

    if (newItems.length > 0) {
      this.loadedItems = [...this.loadedItems, ...newItems]
    } else {
      this.hasMoreData = false
    }

    this.isLoadingMore = false
  }, 1000)
}

// 在Grid中使用loadedItems而不是newsItems
Grid() {
  ForEach(this.loadedItems, (item:NewsItem) => {
    // 网格项内容
  })

  // 加载更多指示器
  if (this.isLoadingMore) {
    GridItem() {
      Row() {
        LoadingProgress()
          .width(24)
          .height(24)

        Text('加载中...')
          .fontSize(14)
          .fontColor('#999999')
          .margin({ left: 8 })
      }
      .width('100%')
      .justifyContent(FlexAlign.Center)
      .padding(16)
    }
  }
}
.onReachEnd(() => {
  this.loadMoreData()
})
4.2 高级搜索与过滤
实现更高级的搜索和过滤功能:
// 高级过滤选项
@State filterOptions: FilterOptions = {
  categories: [],
  dateRange: null,
  sortBy: 'newest'
}

// 高级过滤函数
getAdvancedFilteredNews(): NewsItem[] {
  return this.newsItems.filter((item: NewsItem) => {
    // 分类过滤
    const categoryMatch = this.filterOptions.categories.length === 0 ||
      this.filterOptions.categories.includes(item.category)

    // 日期范围过滤
    let dateMatch = true
    if (this.filterOptions.dateRange) {
      const { start, end } = this.filterOptions.dateRange
      dateMatch = item.publishTime >= start && item.publishTime <= end
    }

    // 搜索关键词过滤
    const searchMatch = !this.searchKeyword ||
      item.title.toLowerCase().includes(this.searchKeyword.toLowerCase()) ||
      item.summary.toLowerCase().includes(this.searchKeyword.toLowerCase()) ||
      item.tags.some(tag => tag.toLowerCase().includes(this.searchKeyword.toLowerCase()))

    return categoryMatch && dateMatch && searchMatch
  }).sort((a, b) => {
    // 排序
    if (this.filterOptions.sortBy === 'newest') {
      return b.publishTime - a.publishTime
    } else if (this.filterOptions.sortBy === 'oldest') {
      return a.publishTime - b.publishTime
    } else if (this.filterOptions.sortBy === 'popular') {
      return b.readCount - a.readCount
    }
    return 0
  })
}
4.3 虚拟列表优化
对于大量数据,可以使用虚拟列表技术优化性能:
// 使用LazyForEach代替ForEach
Grid() {
  LazyForEach(new NewsDataSource(this.getFilteredNews()), (item:NewsItem) => {
    // 网格项内容
  })
}

// 数据源类
class NewsDataSource implements IDataSource {
  private newsItems: NewsItem[]
  private listener: DataChangeListener

  constructor(newsItems: NewsItem[]) {
    this.newsItems = newsItems
  }

  totalCount(): number {
    return this.newsItems.length
  }

  getData(index: number): NewsItem {
    return this.newsItems[index]
  }

  registerDataChangeListener(listener: DataChangeListener): void {
    this.listener = listener
  }

  unregisterDataChangeListener(): void {
    this.listener = null
  }
}
5. 高级样式与主题适配
5.1 根据断点调整样式
根据断点调整组件样式,提供更好的视觉体验:
// 根据断点获取标题样式
getTitleStyle(breakpoint: string) {
  let fontSize = 16
  let fontWeight = FontWeight.Normal
  let maxLines = 2

  switch (breakpoint) {
    case 'sm':
      fontSize = 18
      fontWeight = FontWeight.Bold
      maxLines = 2
      break
    case 'md':
      fontSize = 16
      fontWeight = FontWeight.Bold
      maxLines = 2
      break
    case 'lg':
      fontSize = 20
      fontWeight = FontWeight.Bold
      maxLines = 3
      break
  }

  return {
    fontSize,
    fontWeight,
    maxLines
  }
}

// 使用样式
Text(item.title)
  .fontSize(this.getTitleStyle(this.currentBreakpoint).fontSize)
  .fontWeight(this.getTitleStyle(this.currentBreakpoint).fontWeight)
  .maxLines(this.getTitleStyle(this.currentBreakpoint).maxLines)
  .textOverflow({ overflow: TextOverflow.Ellipsis })
5.2 卡片阴影效果
为网格项添加精美的阴影效果,提升视觉层次感:
// 基础阴影
.shadow({
  radius: 8,
  color: 'rgba(0, 0, 0, 0.1)',
  offsetX: 0,
  offsetY: 2
})

// 高级阴影效果
getCardShadow(breakpoint: string) {
  switch (breakpoint) {
    case 'sm':
      return {
        radius: 8,
        color: 'rgba(0, 0, 0, 0.1)',
        offsetX: 0,
        offsetY: 2
      }
    case 'md':
      return {
        radius: 12,
        color: 'rgba(0, 0, 0, 0.12)',
        offsetX: 0,
        offsetY: 4
      }
    case 'lg':
      return {
        radius: 16,
        color: 'rgba(0, 0, 0, 0.15)',
        offsetX: 0,
        offsetY: 6
      }
    default:
      return {
        radius: 8,
        color: 'rgba(0, 0, 0, 0.1)',
        offsetX: 0,
        offsetY: 2
      }
  }
}
5.3 暗黑模式适配
适配暗黑模式,提供更好的用户体验:
// 监听当前主题模式
@StorageProp('isDarkMode') isDarkMode: boolean = false

// 获取颜色
getColor(lightColor: string, darkColor: string): string {
  return this.isDarkMode ? darkColor : lightColor
}

// 使用动态颜色
Text(item.title)
  .fontColor(this.getColor('#333333', '#FFFFFF'))
  .backgroundColor(this.getColor('#FFFFFF', '#1C1C1E'))
6. 总结
本文深入探讨了HarmonyOS NEXT响应式网格布局的进阶技巧,包括高级断点策略、动态布局调整、交互优化以及性能提升方法。通过这些技巧,开发者可以构建更加灵活、高效的响应式界面,提供卓越的用户体验。
- 0回答
- 5粉丝
- 0关注
