176.[HarmonyOS NEXT 实战案例七:Grid] 嵌套网格布局进阶篇:高级布局与交互技巧
[HarmonyOS NEXT 实战案例七:Grid] 嵌套网格布局进阶篇:高级布局与交互技巧
项目已开源,开源地址: https://gitcode.com/nutpi/HarmonyosNextCaseStudyTutorial , 欢迎fork & star
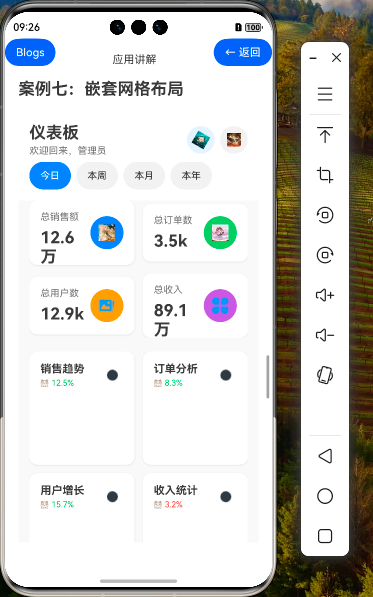
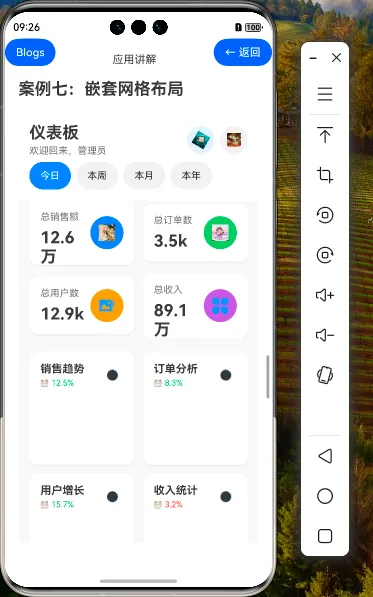
效果演示


1. 引言
在上一篇教程中,我们介绍了HarmonyOS NEXT中嵌套网格布局的基础知识,实现了一个企业级仪表板界面。本篇教程将深入探讨嵌套网格布局的进阶技巧,包括复杂布局策略、高级交互效果、动态网格调整等内容,帮助开发者掌握更高级的Grid嵌套用法,打造出更加专业、交互丰富的应用界面。
2. 高级布局策略
2.1 不规则网格布局
在基础教程中,我们使用了规则的网格布局(如2×2、2×1等)。在进阶应用中,我们可以创建不规则的网格布局,使界面更加丰富多样。
2.1.1 使用网格区域(Grid Areas)
通过定义网格区域,我们可以创建复杂的不规则布局:
Grid() {
    // 大尺寸卡片(占据2×2区域)
    GridItem() {
        this.LargeChartCard(this.dashboardData.charts[0])
    }
    .gridArea('area1')

    // 中等尺寸卡片(占据1×2区域)
    GridItem() {
        this.MediumChartCard(this.dashboardData.charts[1])
    }
    .gridArea('area2')

    // 小尺寸卡片(占据1×1区域)
    GridItem() {
        this.SmallChartCard(this.dashboardData.charts[2])
    }
    .gridArea('area3')

    // 小尺寸卡片(占据1×1区域)
    GridItem() {
        this.SmallChartCard(this.dashboardData.charts[3])
    }
    .gridArea('area4')
}
.columnsTemplate('1fr 1fr')
.rowsTemplate('auto auto auto')
.areas({
    area1: { rowStart: 0, rowEnd: 2, columnStart: 0, columnEnd: 2 },
    area2: { rowStart: 2, rowEnd: 3, columnStart: 0, columnEnd: 2 },
    area3: { rowStart: 0, rowEnd: 1, columnStart: 2, columnEnd: 3 },
    area4: { rowStart: 1, rowEnd: 2, columnStart: 2, columnEnd: 3 }
})
.width('100%')
这种布局方式允许我们为不同类型的内容分配不同大小的区域,创建视觉层次感。
2.1.2 混合使用行列模板
我们可以结合使用固定尺寸和弹性尺寸,创建更加灵活的布局:
Grid() {
    // 网格项内容...
}
.columnsTemplate('1fr 300px')
.rowsTemplate('120px auto 180px')
.width('100%')
这种方式可以确保某些区域保持固定尺寸,而其他区域则根据可用空间自动调整。
2.2 嵌套深度优化
在复杂界面中,Grid嵌套可能会变得很深。过深的嵌套可能导致性能问题和代码可维护性降低。以下是一些优化嵌套深度的策略:
2.2.1 合并相似网格
当多个嵌套网格使用相似的配置时,考虑将它们合并:
// 优化前:两个独立的网格
Grid() { /* 概览卡片 */ }
.columnsTemplate('1fr 1fr')

Grid() { /* 图表卡片 */ }
.columnsTemplate('1fr 1fr')

// 优化后:合并为一个网格,使用分组
Grid() {
    GridItem() {
        Text('概览').fontSize(18).fontWeight(FontWeight.Bold)
    }.gridSpan({ row: 1, col: 2 })

    // 概览卡片
    GridItem() { /* 卡片1 */ }
    GridItem() { /* 卡片2 */ }
    GridItem() { /* 卡片3 */ }
    GridItem() { /* 卡片4 */ }

    GridItem() {
        Text('图表').fontSize(18).fontWeight(FontWeight.Bold)
    }.gridSpan({ row: 1, col: 2 })

    // 图表卡片
    GridItem() { /* 图表1 */ }
    GridItem() { /* 图表2 */ }
}
.columnsTemplate('1fr 1fr')
.rowsTemplate('auto auto auto auto auto auto')
2.2.2 使用Builder代替嵌套
在某些情况下,可以使用@Builder装饰器创建复杂组件,而不是使用深层嵌套:
@Builder
ComplexGridSection(title: string, data: any[]) {
    Column() {
        Text(title)
            .fontSize(18)
            .fontWeight(FontWeight.Bold)
            .margin({ bottom: 12 })

        Grid() {
            ForEach(data, (item) => {
                GridItem() {
                    // 复杂内容...
                }
            })
        }
        .columnsTemplate('1fr 1fr 1fr')
        .width('100%')
    }
    .width('100%')
}

// 使用方式
build() {
    Column() {
        // 直接使用构建器,减少嵌套
        this.ComplexGridSection('快捷操作', this.dashboardData.quickActions)
        this.ComplexGridSection('最近活动', this.dashboardData.recentActivities)
    }
}
2.3 响应式嵌套网格
在不同屏幕尺寸下,我们可能需要调整网格的嵌套结构。以下是一种实现响应式嵌套网格的方法:
@StorageProp('deviceType') deviceType: string = 'phone'

build() {
    Column() {
        if (this.deviceType === 'phone') {
            // 手机布局:垂直堆叠的网格
            Grid() { /* 概览卡片 */ }
            .columnsTemplate('1fr 1fr')

            Grid() { /* 图表卡片 */ }
            .columnsTemplate('1fr')

            Grid() { /* 快捷操作 */ }
            .columnsTemplate('1fr 1fr 1fr')
        } else if (this.deviceType === 'tablet') {
            // 平板布局:混合布局
            Grid() { /* 概览卡片 */ }
            .columnsTemplate('1fr 1fr 1fr 1fr')

            Row() {
                Grid() { /* 图表卡片 */ }
                .columnsTemplate('1fr 1fr')
                .layoutWeight(3)

                Grid() { /* 快捷操作 */ }
                .columnsTemplate('1fr')
                .layoutWeight(1)
            }
        } else {
            // 桌面布局:复杂嵌套
            Row() {
                Column() {
                    Grid() { /* 概览卡片 */ }
                    .columnsTemplate('1fr 1fr')

                    Grid() { /* 图表卡片 */ }
                    .columnsTemplate('1fr 1fr')
                }
                .layoutWeight(3)

                Column() {
                    Grid() { /* 快捷操作 */ }
                    .columnsTemplate('1fr')

                    Grid() { /* 最近活动 */ }
                    .columnsTemplate('1fr')
                }
                .layoutWeight(1)
            }
        }
    }
}
3. 高级交互效果
3.1 网格项动画
为网格项添加动画效果可以提升用户体验。以下是一些常用的网格项动画技巧:
3.1.1 加载动画
@State gridItemsLoaded: boolean = false

aboutToAppear() {
    setTimeout(() => {
        this.gridItemsLoaded = true
    }, 500)
}

build() {
    Grid() {
        ForEach(this.dashboardData.charts, (chart: Chart, index) => {
            GridItem() {
                this.ChartCard(chart)
            }
            .opacity(this.gridItemsLoaded ? 1 : 0)
            .translate({ x: this.gridItemsLoaded ? 0 : 50 })
            .animation({
                delay: 100 * index,
                duration: 300,
                curve: Curve.EaseOut
            })
        })
    }
}
3.1.2 交互反馈动画
@Builder
AnimatedGridItem(content: () => void) {
    Column() {
        content()
    }
    .width('100%')
    .height('100%')
    .borderRadius(12)
    .backgroundColor('#FFFFFF')
    .shadow({
        radius: 8,
        color: 'rgba(0, 0, 0, 0.1)',
        offsetX: 0,
        offsetY: 2
    })
    .stateStyles({
        pressed: {
            scale: { x: 0.95, y: 0.95 },
            shadow: {
                radius: 4,
                color: 'rgba(0, 0, 0, 0.1)',
                offsetX: 0,
                offsetY: 1
            }
        },
        normal: {
            scale: { x: 1, y: 1 },
            shadow: {
                radius: 8,
                color: 'rgba(0, 0, 0, 0.1)',
                offsetX: 0,
                offsetY: 2
            }
        }
    })
    .animation({
        duration: 200,
        curve: Curve.EaseInOut
    })
}

// 使用方式
GridItem() {
    this.AnimatedGridItem(() => {
        this.OverviewCard('总销售额', this.dashboardData.overview.totalSales,
            $r('app.media.big17'), '#007AFF')
    })
}
3.2 网格区域交互
3.2.1 可折叠网格区域
@State isChartSectionExpanded: boolean = true

build() {
    Column() {
        // 可折叠标题栏
        Row() {
            Text('图表分析')
                .fontSize(18)
                .fontWeight(FontWeight.Bold)

            Blank()

            Button() {
                Image(this.isChartSectionExpanded ?
                    $r('app.media.arrow_up') : $r('app.media.arrow_down'))
                    .width(16)
                    .height(16)
            }
            .backgroundColor('transparent')
            .onClick(() => {
                this.isChartSectionExpanded = !this.isChartSectionExpanded
            })
        }
        .width('100%')
        .padding(16)

        // 可折叠内容
        if (this.isChartSectionExpanded) {
            Grid() {
                ForEach(this.dashboardData.charts, (chart: Chart) => {
                    GridItem() {
                        this.ChartCard(chart)
                    }
                })
            }
            .columnsTemplate('1fr 1fr')
            .rowsGap(12)
            .columnsGap(12)
            .width('100%')
            .padding(16)
        }
    }
    .animation({ duration: 300, curve: Curve.EaseInOut })
}
3.2.2 可拖拽调整的网格区域
@State chartSectionHeight: number = 300
@State isDragging: boolean = false

build() {
    Column() {
        // 图表区域
        Column() {
            Grid() { /* 图表内容 */ }
            .columnsTemplate('1fr 1fr')
            .width('100%')

            // 拖拽手柄
            Row() {
                Divider().width(40).height(4).borderRadius(2)
            }
            .width('100%')
            .height(20)
            .justifyContent(FlexAlign.Center)
            .backgroundColor(this.isDragging ? '#E0E0E0' : '#F0F0F0')
            .onTouch((event) => {
                if (event.type === TouchType.Down) {
                    this.isDragging = true
                } else if (event.type === TouchType.Move && this.isDragging) {
                    this.chartSectionHeight += event.touches[0].y - event.lastTouches[0].y
                    // 限制最小和最大高度
                    this.chartSectionHeight = Math.max(100, Math.min(500, this.chartSectionHeight))
                } else if (event.type === TouchType.Up) {
                    this.isDragging = false
                }
            })
        }
        .height(this.chartSectionHeight)
        .animation({ duration: this.isDragging ? 0 : 300, curve: Curve.EaseOut })

        // 其他内容区域
        Grid() { /* 快捷操作和最近活动 */ }
        .layoutWeight(1)
    }
}
4. 动态网格调整
4.1 根据内容动态调整网格
在某些情况下,我们需要根据内容数量或类型动态调整网格结构:
@State chartCount: number = 4

getColumnsTemplate(): string {
    // 根据图表数量动态调整列数
    if (this.chartCount <= 2) {
        return '1fr'
    } else if (this.chartCount <= 4) {
        return '1fr 1fr'
    } else {
        return '1fr 1fr 1fr'
    }
}

build() {
    Column() {
        Grid() {
            ForEach(this.dashboardData.charts.slice(0, this.chartCount), (chart: Chart) => {
                GridItem() {
                    this.ChartCard(chart)
                }
            })
        }
        .columnsTemplate(this.getColumnsTemplate())
        .rowsGap(12)
        .columnsGap(12)
        .width('100%')

        // 控制按钮
        Row() {
            Button('减少图表')
                .onClick(() => {
                    if (this.chartCount > 1) {
                        this.chartCount--
                    }
                })

            Button('增加图表')
                .onClick(() => {
                    if (this.chartCount < this.dashboardData.charts.length) {
                        this.chartCount++
                    }
                })
        }
        .justifyContent(FlexAlign.Center)
        .margin({ top: 16 })
    }
}
4.2 条件渲染网格项
根据不同条件渲染不同的网格项内容:
@State displayMode: 'simple' | 'detailed' = 'simple'

build() {
    Column() {
        // 显示模式切换
        Row() {
            Radio({ value: 'simple', group: 'displayMode' })
                .checked(this.displayMode === 'simple')
                .onChange((isChecked) => {
                    if (isChecked) {
                        this.displayMode = 'simple'
                    }
                })
            Text('简洁模式').margin({ left: 8, right: 16 })

            Radio({ value: 'detailed', group: 'displayMode' })
                .checked(this.displayMode === 'detailed')
                .onChange((isChecked) => {
                    if (isChecked) {
                        this.displayMode = 'detailed'
                    }
                })
            Text('详细模式').margin({ left: 8 })
        }
        .margin({ bottom: 16 })

        // 根据模式渲染不同的网格
        if (this.displayMode === 'simple') {
            Grid() {
                ForEach(this.dashboardData.charts, (chart: Chart) => {
                    GridItem() {
                        this.SimpleChartCard(chart)
                    }
                })
            }
            .columnsTemplate('1fr 1fr 1fr')
        } else {
            Grid() {
                ForEach(this.dashboardData.charts, (chart: Chart) => {
                    GridItem() {
                        this.DetailedChartCard(chart)
                    }
                })
            }
            .columnsTemplate('1fr 1fr')
        }
    }
}
5. 高级样式与视觉效果
5.1 网格项层次感
通过阴影、边框和背景色的组合,创建具有层次感的网格项:
@Builder
LayeredGridItem(content: () => void, importance: 'high' | 'medium' | 'low' = 'medium') {
    Column() {
        content()
    }
    .width('100%')
    .height('100%')
    .padding(importance === 'high' ? 20 : (importance === 'medium' ? 16 : 12))
    .backgroundColor('#FFFFFF')
    .borderRadius(12)
    .border({
        width: importance === 'high' ? 2 : 0,
        color: importance === 'high' ? '#007AFF' : 'transparent',
        style: BorderStyle.Solid
    })
    .shadow({
        radius: importance === 'high' ? 16 : (importance === 'medium' ? 8 : 4),
        color: `rgba(0, 0, 0, ${importance === 'high' ? 0.15 : (importance === 'medium' ? 0.1 : 0.05)})`,
        offsetX: 0,
        offsetY: importance === 'high' ? 4 : (importance === 'medium' ? 2 : 1)
    })
}

// 使用方式
Grid() {
    GridItem() {
        this.LayeredGridItem(() => {
            // 重要内容
        }, 'high')
    }

    GridItem() {
        this.LayeredGridItem(() => {
            // 一般内容
        }, 'medium')
    }

    GridItem() {
        this.LayeredGridItem(() => {
            // 次要内容
        }, 'low')
    }
}
5.2 网格背景图案
为网格添加背景图案,增强视觉效果:
@Builder
GridWithPattern() {
    Stack({ alignContent: Alignment.Center }) {
        // 背景图案
        Grid() {
            ForEach(new Array(20).fill(0), (_, rowIndex) => {
                ForEach(new Array(20).fill(0), (_, colIndex) => {
                    GridItem() {
                        Circle({ width: 4, height: 4 })
                            .fill('#EEEEEE')
                    }
                })
            })
        }
        .columnsTemplate('repeat(20, 1fr)')
        .rowsTemplate('repeat(20, 1fr)')
        .width('100%')
        .height('100%')

        // 前景内容
        Grid() {
            // 实际的网格内容
            GridItem() { /* 内容1 */ }
            GridItem() { /* 内容2 */ }
            // ...
        }
        .columnsTemplate('1fr 1fr')
        .width('100%')
        .height('100%')
    }
    .width('100%')
    .height('100%')
    .backgroundColor('#F8F8F8')
}
6. 实际案例:高级仪表板布局
下面是一个结合了上述进阶技巧的高级仪表板布局示例:
build() {
    Column() {
        // 顶部导航栏(与基础版相同)

        // 主要内容区域
        Scroll() {
            Column() {
                // 概览数据(使用动画网格项)
                Grid() {
                    ForEach(Object.entries(this.dashboardData.overview), ([key, value], index) => {
                        GridItem() {
                            this.AnimatedGridItem(() => {
                                this.OverviewCard(
                                    key === 'totalSales' ? '总销售额' :
                                    key === 'totalOrders' ? '总订单数' :
                                    key === 'totalUsers' ? '总用户数' : '总收入',
                                    value as number,
                                    this.getIconForKey(key),
                                    this.getColorForKey(key)
                                )
                            })
                        }
                        .opacity(this.gridItemsLoaded ? 1 : 0)
                        .translate({ y: this.gridItemsLoaded ? 0 : 20 })
                        .animation({
                            delay: 50 * index,
                            duration: 300,
                            curve: Curve.EaseOut
                        })
                    })
                }
                .columnsTemplate(this.getOverviewColumnsTemplate())
                .rowsGap(12)
                .columnsGap(12)
                .width('100%')
                .margin({ bottom: 20 })

                // 可折叠图表区域
                Column() {
                    // 可折叠标题栏
                    this.CollapsibleSectionHeader('图表分析', this.isChartSectionExpanded, () => {
                        this.isChartSectionExpanded = !this.isChartSectionExpanded
                    })

                    if (this.isChartSectionExpanded) {
                        Grid() {
                            ForEach(this.dashboardData.charts, (chart: Chart, index) => {
                                GridItem() {
                                    this.LayeredGridItem(() => {
                                        this.ChartCard(chart)
                                    }, index === 0 ? 'high' : 'medium')
                                }
                            })
                        }
                        .columnsTemplate(this.getChartsColumnsTemplate())
                        .rowsGap(16)
                        .columnsGap(16)
                        .width('100%')
                        .padding({ top: 12, bottom: 12 })
                    }
                }
                .animation({ duration: 300, curve: Curve.EaseInOut })
                .margin({ bottom: 20 })

                // 快捷操作和最近活动(响应式布局)
                if (this.deviceType === 'phone') {
                    // 手机布局:垂直排列
                    this.QuickActionsSection()
                    this.RecentActivitiesSection()
                } else {
                    // 平板/桌面布局:水平排列
                    Row() {
                        this.QuickActionsSection()
                            .layoutWeight(1)
                            .margin({ right: 8 })

                        this.RecentActivitiesSection()
                            .layoutWeight(1)
                            .margin({ left: 8 })
                    }
                    .width('100%')
                }
            }
            .width('100%')
            .padding(16)
        }
        .layoutWeight(1)
        .backgroundColor('#F8F8F8')
    }
    .width('100%')
    .height('100%')
}
7. 总结
本教程深入探讨了HarmonyOS NEXT中嵌套网格布局的进阶技巧,包括不规则网格布局、嵌套深度优化、响应式嵌套网格、高级交互效果、动态网格调整以及高级样式与视觉效果等内容。通过这些进阶技巧,开发者可以创建出更加灵活、交互丰富、视觉效果出色的应用界面。
- 0回答
- 5粉丝
- 0关注
- 164.[HarmonyOS NEXT 实战案例三:Grid] 不规则网格布局进阶篇:新闻应用高级布局与交互
- 177.[HarmonyOS NEXT 实战案例七:Grid] 嵌套网格布局高级篇:复杂业务场景与高级定制
- 182.[HarmonyOS NEXT 实战案例九:Grid] 电商网格布局进阶篇:打造高级交互与视觉体验
- 165.[HarmonyOS NEXT 实战案例三:Grid] 不规则网格布局高级篇:复杂布局与高级技巧
- 161. [HarmonyOS NEXT 实战案例二:Grid] 照片相册网格布局:进阶篇
- 167.[HarmonyOS NEXT 实战案例四:Grid] 可滚动网格布局进阶篇
- 173.[HarmonyOS NEXT 实战案例六:Grid] 响应式网格布局 - 进阶篇
- 170.[HarmonyOS NEXT 实战案例五:Grid] 动态网格布局进阶篇
- 179.[HarmonyOS NEXT 实战案例八:Grid] 瀑布流网格布局进阶篇
- 185.[HarmonyOS NEXT 实战案例十:Grid] 仪表板网格布局进阶篇
- [HarmonyOS NEXT 实战案例十八] 日历日程视图网格布局(进阶篇)
- 171.[HarmonyOS NEXT 实战案例五:Grid] 动态网格布局高级篇
- 162.[HarmonyOS NEXT 实战案例二:Grid] 照片相册网格布局:高级篇
- 168.[HarmonyOS NEXT 实战案例四:Grid] 可滚动网格布局高级篇
- 174.[HarmonyOS NEXT 实战案例六:Grid] 响应式网格布局 - 高级篇
